I did not trust a no-knead focaccia to deliver that crackling, olive-oil-crusted crust I’d spent years chasing. The whole idea felt like a compromise—something you settle for when you don’t have the arm strength for a proper knead. My first attempt came out of the oven looking like a deflated pillow, pale and apologetic. I almost tossed the whole project right there.
Then my neighbor, who bakes bread every Sunday without measuring a thing, handed me a piece of her focaccia over the fence. That crust shattered when I bit into it. The inside was this cloud of air pockets, almost custard-soft, and the rosemary had crisped up like little fragrant chips. She laughed when I asked for her secret. “I don’t knead it,” she said. “I just let the dough wait.”
So I went home and tried again, this time letting the sourdough starter do the heavy lifting. I stopped hovering over the dough. I stopped worrying about windowpane tests and perfect elasticity. I just mixed flour, water, salt, and my bubbly starter, then walked away. That second focaccia came out golden, blistered, and utterly transformed. It taught me that patience, not effort, makes the best bread.
This perfect no-knead sourdough focaccia with rosemary isn’t about shortcuts. It’s about trusting a slower rhythm—the kind that lets fermentation build flavor while you go about your day. The rosemary gets all woodsy and fragrant in the hot olive oil, and that crackly top? It comes from a generous hand with the oil and a willing heart to let the dough rest. Honestly, this is the bread I make when I want to feel like a baker without acting like one.
Why You’ll Love This Recipe
This focaccia changed how I think about bread. It’s the recipe I send to friends who swear they can’t bake, and they always text me back with photos of golden, bubbly slabs. Here’s why it works so well:
- No kneading required. Seriously—zero arm workout. The sourdough starter develops the gluten structure naturally over time. You mix, wait, and bake.
- Just 5 ingredients. Flour, water, salt, olive oil, and your sourdough starter. That’s it. No yeast packets, no special flours, no complicated add-ins.
- Deep, tangy flavor. The long fermentation gives this focaccia a complexity you can’t rush. It tastes like something from a proper Italian bakery, not a weeknight shortcut.
- That signature crust. The bottom gets shatteringly crisp from the pool of olive oil it bakes in. The top stays golden and craggy, studded with crispy rosemary leaves.
- Incredibly forgiving. Forget about it for an extra hour? No problem. The dough is patient. It rewards flexibility, not perfectionism.
This isn’t just another bread recipe. It’s the one that makes you feel like you’ve unlocked a secret. The texture—chewy, airy, almost bouncy—comes from the natural fermentation, not from any special technique. I’ve tested this with different hydration levels, different flours, and different proofing times, and this version hits the sweet spot every single time.
I make this focaccia for Sunday dinners when I want something rustic on the table. I make it for weekday lunches when I need a sturdy base for Mediterranean stuffed mini peppers with feta or a simple tomato soup. It’s the kind of bread that disappears before it cools, and honestly? That’s the best compliment a loaf can get.
What Ingredients You Will Need
This recipe uses simple, everyday ingredients to build something genuinely special. The magic happens in the proportions and the timing, not in obscure specialty items. Here’s what you’ll need:
- Bread flour – 500 grams (about 4 cups). Bread flour gives this focaccia its chewy structure and those beautiful air pockets. All-purpose flour works in a pinch, but the crumb will be slightly denser. I prefer King Arthur Bread Flour for consistent results.
- Water – 400 grams (about 1 ¾ cups), lukewarm. The water temperature matters here—too hot and you’ll kill the natural yeast in your starter; too cold and fermentation slows to a crawl. Aim for body temperature, around 80°F.
- Active sourdough starter – 150 grams (about ¾ cup), bubbly and recently fed. Your starter should be at its peak—doubled in size, full of bubbles, and smelling pleasantly tangy. A hungry starter won’t give you the same rise.
- Fine sea salt – 10 grams (about 2 teaspoons). Salt controls fermentation and strengthens the dough structure. Don’t skip it or reduce it drastically—the bread will taste flat.
- Extra-virgin olive oil – 60 grams (about ¼ cup), plus more for the pan and topping. Use a good-quality oil here—it’s a primary flavor, not just a cooking fat. I use California Olive Ranch for its fruity, peppery finish.
- Fresh rosemary – 2 tablespoons, finely chopped. Fresh rosemary is non-negotiable for this recipe. Dried rosemary burns in the hot oven and turns bitter. If you only have dried, infuse it in the olive oil first, then strain it out.
- Flaky sea salt – For finishing (optional but highly recommended). Maldon salt flakes add that final pop of salinity that makes the crust sing.
Ingredient tips from my kitchen: If your starter is sluggish, give it an extra feeding 8 hours before you plan to mix the dough. A vigorous starter makes all the difference in rise and flavor. For the water, I use filtered tap water—chlorinated water can inhibit fermentation. And please, don’t skimp on the olive oil in the pan. That generous pool is what creates the fried, crackling bottom that makes focaccia so addictive.
Substitution guidance: Need a gluten-free option? This recipe relies on wheat gluten for structure, so a straight substitution won’t work well. Try a 1:1 gluten-free flour blend designed for bread, but expect a denser crumb. For a whole wheat version, swap 25% of the bread flour for whole wheat flour—any more and the texture gets heavy.
Equipment Needed
You don’t need a stand mixer or a bread lame for this recipe. The equipment list is short and forgiving:
- Large mixing bowl – A 4-quart bowl gives you room to mix without flour flying everywhere. Glass or ceramic works well—metal can react with the dough over long fermentation.
- Digital kitchen scale – This is the one tool I won’t compromise on. Measuring flour by volume is inconsistent; 500 grams of flour can vary by half a cup depending on how you scoop. A $15 scale pays for itself in consistent results.
- 9×13-inch baking pan – A metal or dark-colored pan gives the best bottom crust. Glass pans trap moisture and produce a softer underside. If you only have glass, extend the baking time by 5 minutes.
- Bench scraper or flexible spatula – For folding the dough during the first rise. A bench scraper handles the sticky dough more cleanly than your hands.
- Plastic wrap or a shower cap – To cover the dough during proofing. A damp kitchen towel works too, but plastic wrap creates a better seal.
- Cooling rack – Essential for keeping that bottom crust crispy. If you let the focaccia cool in the pan, steam softens the crust.
Budget-friendly alternatives: No baking scale? Use the spoon-and-level method for flour: spoon it into your measuring cup, then level with a knife. No bench scraper? A plastic dough scraper from the dollar store works fine. No cooling rack? Balance the focaccia on the edges of two upside-down ramekins.
Preparation Method
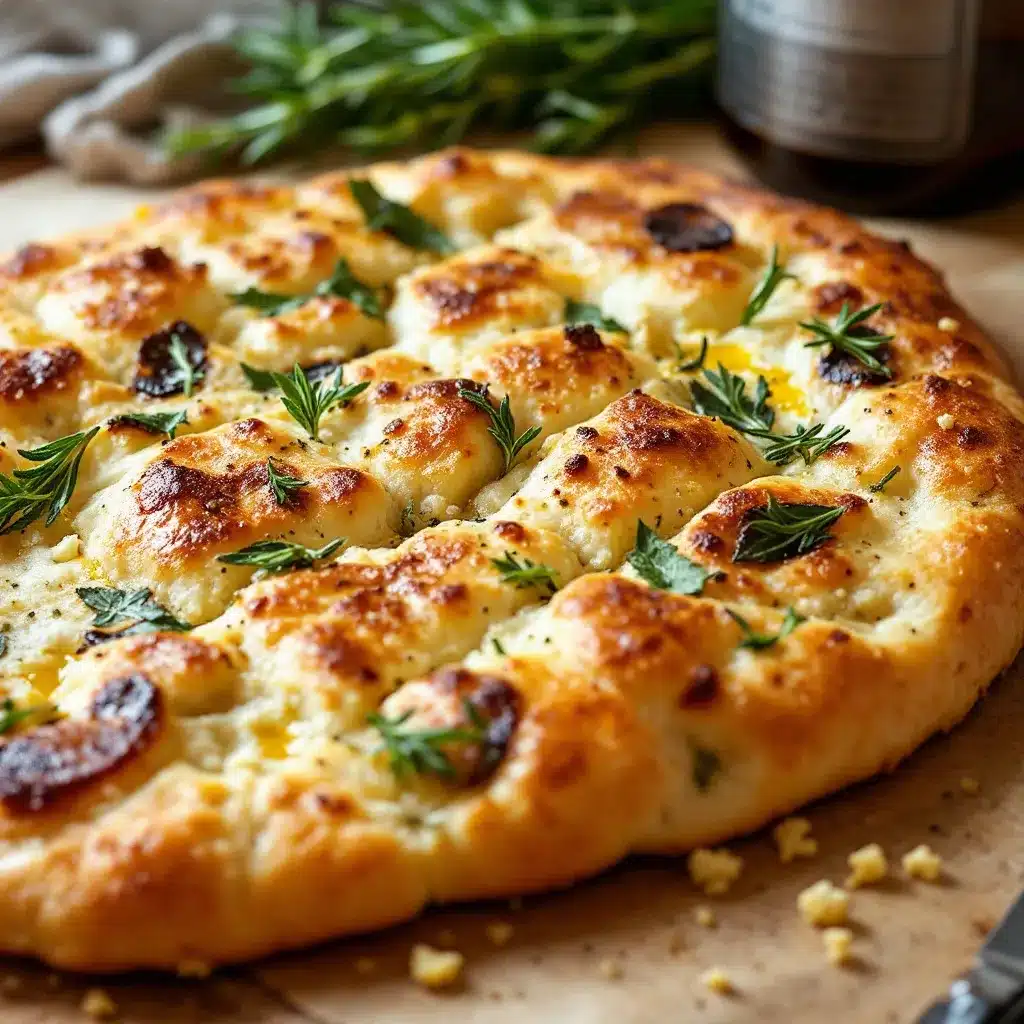
This method looks long because I’ve included every detail I wish someone had told me. The actual hands-on time is about 15 minutes spread across two days. The rest is waiting—the good kind.
Day 1: Mix and Bulk Ferment (Evening, about 10 minutes active)
- Feed your starter. About 4-6 hours before you plan to mix, feed your sourdough starter with equal parts flour and water. You need 150 grams of active, bubbly starter. If your starter hasn’t doubled in size within 6 hours, wait longer—it’s not ready.
- Mix the dough. In your large bowl, combine 400 grams lukewarm water and 150 grams active starter. Stir until the starter dissolves into the water—it should look milky and cloudy. Add 500 grams bread flour and 10 grams fine sea salt. Mix with a spatula or your hand until no dry flour remains. The dough will look shaggy and rough. That’s correct.
- Cover and rest. Cover the bowl with plastic wrap and let it rest for 30 minutes. This autolyse step lets the flour absorb the water and starts gluten development without any work from you.
- Perform stretch and folds. After the rest, wet your hand and grab one side of the dough. Stretch it up and fold it over the center. Rotate the bowl 90 degrees and repeat. Do this 4 times total (one full rotation). The dough will feel loose and sticky at first. Cover and repeat this stretch-and-fold process every 30 minutes for the next 2 hours (4 sets total).
- Bulk ferment overnight. After the last fold, cover the bowl tightly and let it sit at room temperature for 10-12 hours. The dough should double in size and look bubbly on the surface. If your kitchen is cold (below 68°F), it might need 14 hours. If it’s warm (above 78°F), check at 8 hours.
Day 2: Shape, Proof, and Bake (Morning, about 20 minutes active)
- Prepare the pan. Pour 3 tablespoons of olive oil into your 9×13-inch pan. Use your fingers to spread it across the bottom and up the sides. The oil should pool slightly—this is what creates that fried, crispy bottom.
- Transfer the dough. Gently scrape the fermented dough into the oiled pan. It will look bubbly and jiggly. Don’t deflate it aggressively—those bubbles are your air pockets.
- Stretch and relax. Let the dough sit in the pan for 10 minutes. Then, using oiled fingers, gently stretch it toward the corners. The dough will resist and pull back. That’s okay. Let it rest another 10 minutes, then stretch again. Repeat until the dough fills the pan evenly. This might take 3-4 rounds of stretching and resting.
- Final proof. Cover the pan with plastic wrap and let the dough rise at room temperature for 2-3 hours. It should puff up and look pillowy. When you poke it gently, the indentation should remain—that’s the sign it’s ready.
- Preheat the oven. About 30 minutes before baking, place a rack in the middle position and preheat your oven to 425°F (220°C). A hot oven is crucial for that initial oven spring.
- Dimple and top. Uncover the dough. Drizzle 1 more tablespoon of olive oil over the top. Using your fingertips, press deep dimples all across the surface—go all the way to the bottom of the pan. The dough will deflate slightly; that’s fine. Sprinkle the chopped rosemary evenly over the top, pressing the pieces gently into the dimples. Finish with a generous sprinkle of flaky sea salt.
- Bake. Place the pan on the middle rack and bake for 25-30 minutes. At 20 minutes, check the color. The top should be deep golden brown, and the edges should look almost caramelized. If it’s browning unevenly, rotate the pan halfway through.
- Cool. Remove the pan from the oven and let it sit for 5 minutes. Then slide the focaccia onto a cooling rack. Don’t skip this step—cooling in the pan traps steam and softens the bottom crust. Let it cool for at least 20 minutes before slicing. I know it’s hard to wait, but the texture improves dramatically as it rests.
Sensory cues: The dough should feel like a soft, squishy pillow by the time it’s proofed. When you press a finger into it, the indent should stay, not spring back. The baked focaccia should sound hollow when you tap the bottom. The rosemary should be fragrant and slightly crispy, not burnt or soggy.
Cooking Tips & Techniques
I’ve made this focaccia at least two dozen times, and I’ve learned what works through plenty of failures. Here are the lessons that stuck:
Don’t rush the bulk fermentation. The first time I made this, I tried to speed things up by using warm water and a warm spot in my kitchen. The dough rose fast but tasted flat—like bread without a soul. That slow, cool fermentation is where the sourdough character develops. If your kitchen runs warm, use cool water and a shorter bulk time. If it’s cold, embrace the extra hours. The dough knows what it’s doing.
Use generous olive oil. I once tried to cut back on oil to make the focaccia “healthier.” The result was a dry, pale bread that stuck to the pan. The oil isn’t just for flavor—it conducts heat, creates steam, and fries the bottom into that irresistible crust. Pour it without guilt.
Dimple with confidence. Those deep dimples aren’t just decorative. They create pockets that trap olive oil and rosemary, and they prevent large bubbles from forming in the crumb. Press firmly and evenly across the entire surface. Don’t be gentle—the dough can take it.
Watch for browning, not time. Ovens vary wildly. My friend’s oven bakes this focaccia perfectly at 22 minutes; mine needs 28. Trust your eyes and nose over the timer. The top should be deep amber, the edges should look almost burnt (in a good way), and the kitchen should smell like an Italian bakery.
Let it cool completely. I know the temptation to tear into warm bread. But cutting into hot focaccia compresses the crumb and releases steam that should stay inside. Give it 20 minutes minimum. The wait pays off in texture.
One more thing: If your focaccia doesn’t rise as much as you hoped, check your starter’s activity. A sluggish starter is the most common culprit. Give it an extra feeding or two before your next batch. Also, make sure your salt is evenly distributed—clumps of salt can inhibit yeast activity in spots.
Variations & Adaptations
This recipe is a canvas. Once you’ve mastered the basic version, try these variations:
Herb and garlic focaccia. Add 2 minced garlic cloves and 1 tablespoon fresh thyme leaves to the olive oil before pouring it into the pan. The garlic infuses the oil as it bakes, creating a savory, aromatic base. I tried this for a dinner party and it disappeared in minutes.
Sun-dried tomato and olive focaccia. After the final stretch, press ⅓ cup chopped sun-dried tomatoes and ¼ cup pitted Kalamata olives into the dough before dimpling. The salty, tangy bursts complement the sourdough tang beautifully. Serve it alongside slow cooker honey garlic chicken meal prep bowls for a complete meal.
Everything bagel focaccia. Skip the rosemary. Before baking, brush the top with an egg wash (1 egg beaten with 1 tablespoon water) and sprinkle generously with everything bagel seasoning. The sesame seeds and poppy seeds toast in the oven, and the garlic flakes get all crispy. This version is dangerous—I can’t stop eating it.
Whole wheat variation. Replace 125 grams of bread flour with whole wheat flour (25% of total). Increase the water by 25 grams, as whole wheat absorbs more liquid. The crumb will be denser and nuttier, with a more pronounced sourdough tang. It’s excellent with sharp cheddar and apple slices.
Gluten-free adaptation. Use a 1:1 gluten-free bread flour blend and add 1 teaspoon xanthan gum if your blend doesn’t include it. The dough will be wetter and more batter-like. Bake in a parchment-lined pan and extend the baking time by 5-7 minutes. The texture won’t be identical, but it’s genuinely good—my gluten-sensitive friend requests it regularly.
Rosemary and sea salt is the classic for a reason. The woody, piney rosemary pairs perfectly with the fruity olive oil and tangy sourdough. But don’t be afraid to experiment. Rosemary also works beautifully with lemon herb salmon sheet pan dinner—the same herb bridges both dishes effortlessly.
Serving & Storage Suggestions
This focaccia shines in so many settings. Here’s how to serve and store it for the best experience:
Serving temperature: Focaccia is best served warm or at room temperature. If you’ve made it ahead, reheat slices in a 350°F oven for 5 minutes—this revives the crispy crust. Microwaving turns it rubbery, so avoid that route.
Presentation ideas: Cut the focaccia into squares or rectangles for a rustic look. Serve it on a wooden board with a small bowl of olive oil and balsamic vinegar for dipping. For a more elegant presentation, slice it into thin strips and arrange them like a bread basket. Top with a sprinkle of fresh rosemary and flaky salt right before serving.
What to serve with it: This focaccia is incredibly versatile. Pair it with soups and stews for dipping, or use it as a base for sandwiches. It’s excellent alongside cucumber mint green tea cooler for a light summer lunch. For a heartier meal, serve it with roasted vegetables, grilled meats, or a simple green salad. It also makes fantastic croutons—just cube day-old focaccia, toss with olive oil and herbs, and bake until crispy.
Storage instructions: Store leftover focaccia in an airtight container at room temperature for up to 2 days. Do not refrigerate—the cold dries out the bread and ruins the texture. If you need to keep it longer, freeze it. Wrap individual slices tightly in plastic wrap, then place them in a freezer bag. They’ll keep for up to 3 months.
Reheating from frozen: No need to thaw. Place frozen slices directly on a baking sheet and warm them in a 350°F oven for 8-10 minutes. The crust crisps back up, and the inside stays soft. It’s almost as good as fresh.
Flavor development: Interestingly, this focaccia tastes even better the next day. The rosemary and olive oil flavors meld overnight, and the sourdough tang becomes more pronounced. If you can resist eating it all fresh, save some for day two—it’s a different (and equally wonderful) experience.
Nutritional Information & Benefits
Here’s the approximate nutritional breakdown for one serving (1/8 of the recipe):
| Nutrient | Amount per serving |
|---|---|
| Calories | 280 |
| Total Fat | 12g |
| Saturated Fat | 2g |
| Carbohydrates | 36g |
| Fiber | 2g |
| Protein | 7g |
| Sodium | 480mg |
Health benefits worth noting: Sourdough fermentation offers several advantages over conventional yeast bread. The long fermentation breaks down phytic acid, making minerals like iron, zinc, and magnesium more bioavailable. The natural fermentation also produces lactic acid, which gives sourdough a lower glycemic index than regular bread—meaning it causes a slower, steadier rise in blood sugar.
Dietary considerations: This recipe is dairy-free and egg-free. It contains gluten from wheat flour, so it’s not suitable for celiac disease. The gluten-free adaptation mentioned in the variations section works for those with gluten sensitivity. The olive oil provides heart-healthy monounsaturated fats, and the rosemary offers antioxidant compounds like rosmarinic acid.
My personal take: I don’t make this focaccia thinking about nutrition. I make it because it brings people together around the table. But I do feel good knowing that the slow fermentation makes it more digestible than quick breads. It’s a small, meaningful difference—the kind that aligns with how I want to eat: real food, made slowly, shared generously.
Conclusion
This perfect no-knead sourdough focaccia with rosemary taught me something important about cooking: the best things often come from stepping back, not pushing harder. The dough doesn’t need your constant attention. It needs time, good ingredients, and a little trust. In return, it gives you a bread that crackles when you bite into it, that tastes like sunshine and patience and everything good about slow food.
I’ve made this recipe for lazy Sunday afternoons, for last-minute dinner parties, and for quiet mornings when I just want the house to smell like rosemary and olive oil. Every time, it delivers. The crust is always shatteringly crisp. The crumb is always tender and airy. And the rosemary—crisped and fragrant—is always the star.
Now it’s your turn. Try this recipe and see what happens. Play with the herbs, experiment with the toppings, and make it your own. When you pull that golden, bubbling focaccia from the oven, I’d love to hear about it. Drop a comment below or tag me in your photos. Tell me what variation you tried, what you served it with, or just how many pieces you ate before it cooled. Because honestly? That’s the real measure of a great recipe.
Frequently Asked Questions
Can I use active dry yeast instead of sourdough starter?
Yes, but the flavor and texture will be different. To substitute, omit the sourdough starter and use 2 teaspoons active dry yeast dissolved in 400 grams lukewarm water with 1 teaspoon sugar. Let it sit for 5 minutes until frothy, then proceed with the recipe. The bulk fermentation will be faster—about 2-3 hours at room temperature. The focaccia will be softer and less tangy, but still delicious.
Why is my focaccia dense and not airy?
Dense focaccia usually means one of three things: your starter wasn’t active enough, you didn’t ferment it long enough, or you deflated the dough too aggressively during shaping. Make sure your starter is bubbly and doubled before mixing. Give the bulk fermentation enough time—look for the dough to double in size, not just the clock. And when transferring to the pan, handle it gently to preserve those precious air bubbles.
Can I make this recipe gluten-free?
Yes, with adjustments. Use a 1:1 gluten-free bread flour blend and add 1 teaspoon xanthan gum if your blend doesn’t include it. The dough will be wetter and more batter-like. Bake in a parchment-lined pan and extend the baking time by 5-7 minutes. The texture won’t be identical to wheat-based focaccia, but it’s genuinely good—light, tender, and full of flavor.
How do I know when my sourdough starter is ready to use?
A ready starter should have doubled in size within 4-6 hours of feeding, be full of visible bubbles (both large and small), and smell pleasantly tangy—like yogurt or ripe fruit. It should pass the “float test”: drop a small spoonful of starter into a glass of water; if it floats, it’s ready. If it sinks, give it more time or another feeding.
Can I freeze the baked focaccia?
Absolutely. Let the focaccia cool completely, then wrap individual slices tightly in plastic wrap and place them in a freezer bag. They’ll keep for up to 3 months. To reheat, place frozen slices directly on a baking sheet and warm in a 350°F oven for 8-10 minutes. The crust crisps back up beautifully. I often bake a double batch just to have frozen slices on hand for quick meals.
Pin This Recipe!

Perfect No-Knead Rosemary Focaccia: Easy 5-Ingredient Recipe

This no-knead sourdough focaccia with rosemary delivers a crackling, olive-oil-crusted crust and a tender, airy crumb. With just 5 ingredients and patience, you can create bakery-quality bread at home.
- Prep Time: 15 minutes
- Cook Time: 30 minutes
- Total Time: 13 hours 45 minutes (includes overnight fermentation)
- Yield: 8 servings 1x
- Category: Bread
- Cuisine: Italian
Ingredients
- 500 grams bread flour (about 4 cups)
- 400 grams lukewarm water (about 1 ¾ cups)
- 150 grams active sourdough starter (about ¾ cup), bubbly and recently fed
- 10 grams fine sea salt (about 2 teaspoons)
- 60 grams extra-virgin olive oil (about ¼ cup), plus more for the pan and topping
- 2 tablespoons fresh rosemary, finely chopped
- Flaky sea salt for finishing (optional)
Instructions
- Day 1: Feed your starter 4-6 hours before mixing. You need 150 grams of active, bubbly starter.
- In a large bowl, combine 400 grams lukewarm water and 150 grams active starter. Stir until dissolved.
- Add 500 grams bread flour and 10 grams fine sea salt. Mix until no dry flour remains. The dough will be shaggy.
- Cover and let rest for 30 minutes (autolyse).
- Perform stretch and folds: wet your hand, stretch one side of the dough, and fold it over the center. Rotate the bowl 90 degrees and repeat. Do 4 folds total. Repeat this process every 30 minutes for 2 hours (4 sets).
- Cover tightly and bulk ferment at room temperature for 10-12 hours, until doubled in size and bubbly.
- Day 2: Pour 3 tablespoons olive oil into a 9×13-inch pan and spread evenly.
- Gently scrape the fermented dough into the oiled pan. Let it sit for 10 minutes.
- Using oiled fingers, gently stretch the dough toward the corners. Let it rest 10 minutes, then stretch again. Repeat until the dough fills the pan evenly (3-4 rounds).
- Cover with plastic wrap and let proof at room temperature for 2-3 hours, until puffy and pillowy.
- Preheat oven to 425°F (220°C) 30 minutes before baking.
- Uncover the dough. Drizzle 1 tablespoon olive oil over the top. Use your fingertips to press deep dimples across the entire surface.
- Sprinkle chopped rosemary evenly over the top, pressing into the dimples. Finish with flaky sea salt.
- Bake for 25-30 minutes, until deep golden brown and edges are caramelized. Rotate pan halfway if needed.
- Let cool in the pan for 5 minutes, then transfer to a cooling rack. Cool for at least 20 minutes before slicing.
Notes
For best results, use a vigorous starter and don’t rush the bulk fermentation. The dough is forgiving—extra proofing time is fine. Use generous olive oil for a crispy crust. Let cool completely before slicing for optimal texture.
Nutrition
- Serving Size: 1/8 of recipe
- Calories: 280
- Sodium: 480
- Fat: 12
- Saturated Fat: 2
- Carbohydrates: 36
- Fiber: 2
- Protein: 7
Keywords: no-knead focaccia, sourdough focaccia, rosemary focaccia, easy bread recipe, 5-ingredient bread


