I burned three batches of white chocolate before I finally figured out why it kept seizing into a grainy, unusable mess. It wasn’t the heat source, and it wasn’t the brand of chocolate I bought from the grocery store down the street. It was the humidity in my kitchen on a particularly damp October afternoon, and my own impatience to get the candy corn into the mix before the chocolate had cooled just enough to handle it. You know how it goes when you’re trying to make a festive treat for a party that’s happening in two hours? You rush. You ignore the warning signs. And then you end up with a bowl of brown, clumpy goo that tastes like regret and scorched dairy.
This happened to me last year when I was trying to recreate a fancy bark I’d seen on social media. I wanted it to be perfect for the neighborhood Halloween gathering. I had the candy corn ready. I had the molds polished. But I didn’t respect the chocolate. Honestly, I almost gave up on the whole idea and just bought a bag of fun-sized Snickers from the gas station instead. But then I remembered that white chocolate is actually very forgiving if you let it breathe. So I scraped the burnt mess out of the bowl, washed it, and started over. This time, I let the chocolate sit for a full five minutes after melting. I worked slowly. I didn’t panic.
The result was a sheet of creamy, sweet perfection that shattered into beautiful, irregular shards. It wasn’t just edible; it was the highlight of the party. People were asking for the recipe before they even finished their first piece. That moment changed how I think about simple snacks. It taught me that the best treats often come from a little bit of failure and a lot of patience. Now, I make this easy candy corn white chocolate bark every year. It’s become my go-to way to say hello to the season, and I’m sharing exactly how to do it right this time.
Why You’ll Love This Recipe
There is a specific kind of magic that happens when you combine high-quality white chocolate with the nostalgic pop of candy corn. It’s not just a snack; it’s a texture experience. The crunch of the candy corn against the smooth, melting snap of the chocolate creates a balance that keeps you coming back for more. I’ve tested this recipe with dozens of different chocolate brands and candy corn types, and I can tell you from experience that this specific ratio is the sweet spot. It’s not too sweet, and it’s not too rich. It’s just right.
Here is why this recipe has earned a permanent spot in my rotation:
- Quick & Easy: You literally have three main ingredients. From melting to fridge to finished product, you’re looking at about 20 minutes of active time. This is perfect for busy weeknights or when you need a last-minute gift for a teacher or neighbor.
- Simple Ingredients: No fancy grocery trips needed. You likely already have white chocolate chips and candy corn in your pantry or freezer. It’s pantry-friendly cooking at its finest.
- Perfect for Fall Parties: Whether it’s a Halloween bash, a Thanksgiving handout, or just a cozy movie night, this bark fits the bill. The orange, yellow, and white colors are instantly recognizable and festive.
- Crowd-Pleaser: Kids love the candy corn, and adults love the high-quality chocolate. It bridges the gap between a kid’s treat and a sophisticated dessert. I’ve served this at office potlucks, and it always disappears first.
- Unbelievably Delicious: The texture and flavor combo is next-level comfort food. The vanilla notes in the white chocolate pair beautifully with the slight tang of the candy corn.
What makes this recipe different from the rest is the technique. A lot of people just dump the candy corn into hot chocolate, and it sinks to the bottom or melts unevenly. I’ve developed a method where you create a base layer, add the candy corn, and then seal it with a top layer. This ensures every piece has that perfect ratio of chocolate to candy. It’s not just another version—it’s your best version. This recipe isn’t just good—it is the kind that makes you close your eyes after the first bite. It’s comfort food reimagined—healthier, faster, but with the same soul-soothing satisfaction.
What Ingredients You Will Need
This recipe uses simple, wholesome ingredients to deliver bold flavor and satisfying texture without the fuss. The beauty of this bark lies in its minimalism. You don’t need a dozen spices or exotic fruits. You just need good quality chocolate and classic candy corn. However, the quality of your white chocolate matters more than you might think. Cheap chocolate often contains more fillers and less cocoa butter, which can lead to a waxy texture. I recommend sticking to a brand you enjoy eating on its own, like Ghirardelli or Callebaut, for the best melt and snap.
Here is what you will need to gather:
- White Chocolate Chips: 2 cups (about 340g). Look for semi-sweet or milk chocolate if you prefer a less sweet option, but classic white chocolate is the traditional choice here. Ensure they are dry and free of clumps.
- Candy Corn: 1 cup (about 100g). Standard Halloween candy corn works best. Avoid the “giant” candy corn as it can be too large and overpower the chocolate balance.
- Vanilla Extract: 1/2 teaspoon. This is optional but highly recommended. It adds depth to the white chocolate and makes it taste more homemade rather than manufactured.
- Salt Flakes (Optional): A tiny pinch of flaky sea salt. The salt cuts through the sweetness and elevates the flavor profile significantly. If you have it, sprinkle it on right before the chocolate sets.
If you want to get creative, you can swap in milk chocolate chips for a richer flavor. For a dietary variation, you can use dairy-free white chocolate chips, though keep in mind that some vegan chocolates melt differently and may require lower heat. In the summer, you might even consider adding dried cranberries for a tart contrast, but for this specific fall theme, sticking to the classic trio of ingredients is the way to go. The simplicity is the point.
Equipment Needed
You don’t need a lot of fancy gadgets to make this bark. In fact, keeping the equipment simple helps keep the process stress-free.
- Microwave-Safe Bowl: This is your primary tool. A large glass or ceramic bowl works best because it distributes heat evenly. Avoid metal bowls in the microwave.
- Silicone Spatula: Essential for scraping the sides of the bowl and folding in the candy corn. A heat-resistant silicone spatula is a must-have in any kitchen. It’s also easier to clean than a spoon.
- Baking Sheet: A standard half-sheet pan. I prefer a dark metal sheet, but light-colored aluminum works too. Just make sure it fits in your refrigerator.
- Parchment Paper: Do not skip this. Lining your baking sheet with parchment paper prevents sticking and makes cleanup a breeze. It also helps the bark release easily once it’s set.
- Microplane or Knife: To break the bark into shards. A knife works fine, but a microplane can create smaller, more delicate pieces if you’re making individual servings.
If you don’t have a microwave, you can use a double boiler setup with a heatproof bowl over a pot of simmering water. This gives you more control over the temperature and reduces the risk of burning the chocolate. I’ve tried both methods, and while the double boiler is more traditional, the microwave is just as effective if you use short bursts of power.
Preparation Method
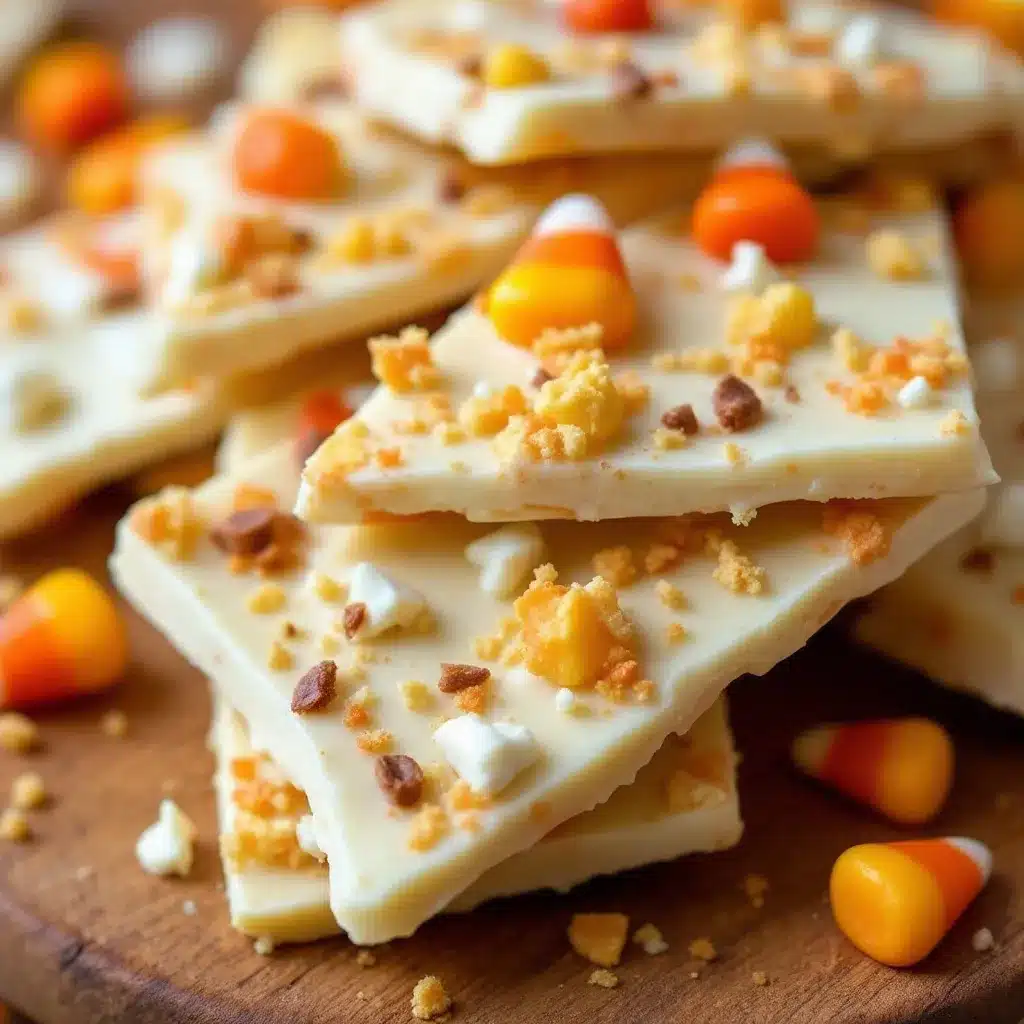
Making this bark is straightforward, but precision matters when it comes to melting chocolate. Here is exactly how to do it, step by step, to ensure that perfect snap and creamy texture.
- Prepare Your Pan (2 minutes): Line your baking sheet with parchment paper. If your parchment paper is curling up, you can use a tiny bit of butter or chocolate on the corners of the parchment to stick it to the pan. This keeps everything flat and neat. Set the pan aside near your microwave.
- Melt the Chocolate (3-4 minutes): Place your white chocolate chips in the microwave-safe bowl. Microwave on 50% power for 30 seconds. Remove the bowl and stir thoroughly. This is crucial. You want to melt the chocolate slowly and evenly. If you microwave on high, the chips will melt unevenly, and you’ll end up with hot spots that can scorch the chocolate. Repeat this process in 30-second intervals, stirring after each one, until the chocolate is mostly melted with just a few small lumps left.
- Finish Melting and Flavor (1 minute): The residual heat from the chocolate will melt the remaining lumps. Stir in the vanilla extract now. If you’re using salt flakes, hold off on adding them until the very end. The chocolate should be smooth, glossy, and fluid. If it looks too thick, you can add a tiny teaspoon of coconut oil or vegetable shortening to thin it out, but this is rarely necessary with good quality chips.
- Create the Base Layer (1 minute): Pour about two-thirds of the melted chocolate onto the prepared baking sheet. Use your spatula to spread it out into an even layer. Aim for a thickness of about 1/4 inch. Don’t worry if it’s not perfect; the rustic look is part of the charm. You want enough chocolate to support the candy corn without it sinking too much.
- Add the Candy Corn (1 minute): Sprinkle the candy corn evenly over the base layer of chocolate. Press them down gently with the back of your spoon or spatula. You want them to be about halfway submerged. This ensures they stay in place and don’t roll around when you pour the top layer. Take your time here to distribute them evenly so every shard has candy corn.
- Add the Top Layer (2 minutes): Pour the remaining one-third of the white chocolate over the candy corn. Use your spatula to gently spread this layer, covering the candy corn completely. Be careful not to drag the spatula too hard, or you’ll dislodge the candy corn. Just smooth the top until it’s even. If you’re using salt flakes, sprinkle them over the wet chocolate now.
- Chill and Set (15-20 minutes): Place the baking sheet in the refrigerator. Let it sit for at least 15 minutes, or until the chocolate is completely firm to the touch. If you’re in a hurry, you can put it in the freezer for 10 minutes, but the refrigerator is gentler and prevents condensation from forming on the chocolate.
- Break and Serve: Once set, remove the sheet from the fridge. Peel the parchment paper off the pan. Use your hands to break the bark into irregular shards. Tear it along the natural fracture lines for the best presentation. Store in an airtight container until ready to serve.
Cooking Tips & Techniques
Melting white chocolate is a delicate dance. It has a lower melting point than dark chocolate and contains milk solids that can easily burn. Here are some pro tips I’ve learned from years of trial and error to help you avoid common pitfalls.
First, never microwave on high power. This is the number one mistake people make. High heat causes the sugars in the white chocolate to caramelize and burn, turning it grainy and bitter. Always use 50% power or the “defrost” setting. Patience is your best friend here.
Second, keep everything dry. Even a tiny drop of water can cause white chocolate to seize up and become a solid, unworkable lump. Make sure your bowl, spatula, and hands are completely dry before you start. If your kitchen is humid, consider running the air conditioner or a dehumidifier for a bit before you begin.
Third, stir constantly. Stirring distributes the heat evenly. If you see steam rising from the chocolate, it’s too hot. Remove it from the microwave immediately and let it cool for a minute before stirring again.
Finally, don’t overwork the candy corn. When you press the candy corn into the base layer, do it gently. If you press too hard, the candy corn might crack or break, which affects the final texture. You want whole pieces for that satisfying crunch.
Variations & Adaptations
While the classic candy corn and white chocolate combination is timeless, there are plenty of ways to tweak this recipe to suit your taste or dietary needs.
- Milk Chocolate Twist: Swap the white chocolate for milk chocolate chips. This creates a richer, less sweet bark that pairs beautifully with the tangy candy corn. It’s a great option for adults who find white chocolate too sweet.
- White Chocolate Chip Addition: For extra texture, sprinkle a handful of mini white chocolate chips over the top layer before chilling. This adds a nice crunch and makes the bark look more professional.
- Pumpkin Spice Variation: Add 1/2 teaspoon of pumpkin pie spice to the melted chocolate before spreading it on the pan. This gives the bark a warm, autumnal flavor that complements the candy corn perfectly.
- Gluten-Free Option: Most candy corn is naturally gluten-free, but always check the label. Ensure your chocolate chips are also certified gluten-free if you have celiac disease or a severe allergy.
- Vegan Version: Use dairy-free white chocolate chips and verify that your candy corn is vegan (some brands use beeswax). This allows everyone at your party to enjoy the treat.
I’ve tried adding a drizzle of caramel sauce over the top before it sets, and it adds a delicious gooey layer. It’s not necessary, but it’s a nice indulgence for special occasions.
Serving & Storage Suggestions
This bark is best served at room temperature. If you eat it straight from the fridge, the chocolate can be too hard and might not have the full creamy flavor. Let it sit on the counter for 5-10 minutes before serving.
For presentation, arrange the shards on a platter with some fresh fall leaves or mini pumpkins for a festive touch. It pairs wonderfully with a glass of cold milk or a cup of hot coffee. If you’re serving it at a party, place small bowls of the bark on tables so guests can graze throughout the event.
To store the bark, keep it in an airtight container in the refrigerator. It will stay fresh for up to two weeks. If you’re in a warm climate, the refrigerator is essential to prevent melting. You can also freeze the bark for up to three months. Just make sure it’s wrapped tightly in plastic wrap and then in aluminum foil to prevent freezer burn. When ready to eat, let it thaw in the refrigerator overnight.
The flavors actually meld together nicely after a day or two in the fridge. The chocolate softens slightly, and the candy corn releases a bit of its flavor into the chocolate, creating a more integrated taste. This is why I always make it a day before I need it.
Nutritional Information & Benefits
This recipe is high in sugar and fat, so it should be enjoyed in moderation. Each serving (approximately one large shard) contains about 150-200 calories, depending on the size. The white chocolate provides calcium and vitamin D, while the candy corn offers a quick energy boost from simple carbohydrates.
For those watching their sugar intake, you can reduce the amount of candy corn used or swap it for sugar-free candy corn, though the texture may differ slightly. If you are dairy-free, the vegan version eliminates lactose but still contains sugar. Always check the labels of your specific brands for accurate nutritional information.
From a wellness perspective, I view this as a treat to be savored, not a health food. The joy it brings is part of the nutritional value in my book. It’s a way to celebrate the season and share happiness with others.
Conclusion
Making this easy candy corn white chocolate bark is a simple pleasure that yields impressive results. It’s a recipe that requires minimal effort but delivers maximum satisfaction. I love how it brings back memories of Halloween mornings and fall festivals. It’s a testament to the idea that good food doesn’t have to be complicated.
I encourage you to try this recipe and make it your own. Experiment with different chocolate types or add-ins to find your perfect combination. Share your creations with friends and family, and don’t be afraid to admit if you burn the chocolate the first time—we’ve all been there.
If you make this recipe, I’d love to hear how it turned out. Leave a comment below with your tips or variations. Share your photos on social media and tag me. Let’s keep the conversation going about all things sweet and simple. Enjoy the process, and enjoy the bark.
Frequently Asked Questions
Can I use dark chocolate instead of white chocolate?
Yes, you can use dark chocolate, but it will change the flavor profile significantly. Dark chocolate is less sweet and has a stronger cocoa flavor, which might overpower the mild taste of the candy corn. Milk chocolate is a safer middle ground if you want less sweetness than white chocolate.
How long does it take for the bark to set?
It typically takes 15-20 minutes in the refrigerator for the bark to set completely. If you’re in a hurry, you can put it in the freezer for 10 minutes, but be careful not to leave it in too long, as condensation can form when you take it out.
Can I make this recipe ahead of time?
Absolutely. You can make this bark up to two weeks in advance. Store it in an airtight container in the refrigerator. It actually tastes better after a day or two as the flavors meld together.
Is candy corn gluten-free?
Most standard candy corn is gluten-free, but it’s always important to check the packaging. Some brands may process their candy in facilities that also handle wheat. Look for a gluten-free label to be sure.
Why did my chocolate seize?
Chocolate seizes when it comes into contact with even a small amount of water or steam. Make sure your bowl and utensils are completely dry. Also, avoid microwaving on high power, as overheating can cause the chocolate to break down and become grainy.
Pin This Recipe!
Easy Candy Corn White Chocolate Bark
A simple, festive 3-ingredient party snack combining creamy white chocolate with nostalgic candy corn. This recipe uses a layering technique to ensure the perfect ratio of chocolate to candy in every shard.
- Prep Time: 5 minutes
- Cook Time: 5 minutes
- Total Time: 20 minutes
- Yield: Approximately 10-12 servings 1x
- Category: Dessert
- Cuisine: American
Ingredients
- 2 cups white chocolate chips (about 340g)
- 1 cup candy corn (about 100g)
- 1/2 teaspoon vanilla extract
- Pinch of flaky sea salt (optional)
Instructions
- Line a baking sheet with parchment paper and set aside.
- Place white chocolate chips in a microwave-safe bowl. Microwave on 50% power for 30 seconds, then stir thoroughly.
- Continue microwaving in 30-second intervals, stirring after each one, until the chocolate is mostly melted with a few small lumps remaining.
- Stir the residual heat to melt the remaining lumps. Stir in the vanilla extract until the chocolate is smooth, glossy, and fluid.
- Pour about two-thirds of the melted chocolate onto the prepared baking sheet and spread into an even layer (approx. 1/4 inch thick).
- Sprinkle candy corn evenly over the base layer and press down gently so they are about halfway submerged.
- Pour the remaining one-third of white chocolate over the candy corn and spread gently to cover completely. Sprinkle with salt flakes if using.
- Refrigerate for 15-20 minutes until the chocolate is completely firm.
- Remove from fridge, peel off parchment paper, and break the bark into irregular shards.
Notes
Ensure all equipment and hands are completely dry to prevent the chocolate from seizing. Do not microwave on high power; use 50% power to avoid burning. For best flavor, let the bark sit for a day or two in the fridge to allow flavors to meld. Store in an airtight container in the refrigerator for up to two weeks or freeze for up to three months.
Nutrition
- Serving Size: One large shard
- Calories: 175
- Sugar: 18
- Sodium: 15
- Fat: 10
- Saturated Fat: 6
- Carbohydrates: 22
- Protein: 2
Keywords: candy corn, white chocolate bark, Halloween snack, fall dessert, easy party snack, 3-ingredient recipe, gluten-free option


