The way the marshmallow stretches—thin, glossy, almost translucent before it snaps—that’s the whole reason I make these. Everything else is just getting out of the way so that sticky pull can happen. I remember standing in my friend’s kitchen last October, watching her stir a pot of butter and marshmallows, and thinking, “That’s it. That’s the texture I’ve been chasing.” She dumped in a bag of candy corn at the last second, and I nearly lost my mind. Not because it was fancy or complicated, but because it was so unapologetically silly. Orange, yellow, and white all melted into that gooey base, turning something ordinary into a total conversation piece.
Honestly, I wasn’t sure if the candy corn would just dissolve into a sugary mess or hold its own. But the first bite? Those little kernels stayed chewy, almost like a surprise in every mouthful. The marshmallow part is soft and pillowy, but the candy corn gives it this firm little pop that keeps you reaching for another square. It’s not trying to be gourmet—it’s trying to be fun, and honestly, that’s way harder to pull off.
These Easy Candy Corn Rice Krispie Treats have become my go-to for Halloween parties, classroom treats, or just a Tuesday afternoon when I need a hit of nostalgia. They take twenty minutes, use stuff you probably already have, and they make people smile before they even take a bite. There’s something about that tricolor look that feels like a little wink—like, yeah, I know this is ridiculous, but isn’t that the point? That’s the kind of recipe that sticks around.
Why You’ll Love This Recipe
Look, I’ve tested a lot of variations on the classic crispy treat over the years. Some add chocolate, some swap in fruity cereal, but this one hits different. Here’s why I keep coming back to it:
- Quick & Easy: From start to finish, you’re looking at about 20 minutes. That includes melting, mixing, pressing, and waiting for them to set. Perfect for when you need something fast for a bake sale or last-minute gathering.
- Simple Ingredients: You need butter, marshmallows, crispy rice cereal, and a bag of candy corn. That’s it. No fancy extracts, no specialty stores, no hunting down hard-to-find items.
- Perfect for Halloween: These are practically made for October. The colors match the season, kids go wild for them, and they’re way easier than decorating a batch of cookies. Great for class parties, trunk-or-treat events, or just a spooky movie night.
- Crowd-Pleaser: I’ve brought these to potlucks where people usually go for the savory stuff first, and they disappear. There’s something about the texture combo—soft marshmallow with that firm candy corn bite—that keeps hands reaching back.
- Unbelievably Delicious: The flavor is sweet, buttery, and just a little salty from the cereal. It’s comfort food in its purest form, no apologies needed.
What makes this different from other versions? Most recipes either dump the candy corn in whole and hope for the best, or they try to layer it on top like some kind of fancy garnish. I’ve found that folding it in gently while the marshmallow mixture is still warm gives you those perfect pockets of chewy candy throughout. Every bite has a little surprise. Plus, I use an extra tablespoon of butter compared to the box recipe—trust me on that one. It keeps the treats softer longer and adds a richness that balances all that sugar.
This is the kind of recipe that makes you feel like a kitchen hero without actually doing much. You’ll look at the finished pan and think, “Wait, that’s it? That was too easy.” But everyone who eats one will think you spent way more time than you actually did. That’s the sweet spot, right there.
What Ingredients You Will Need
This recipe relies on a short list of pantry staples, plus one seasonal star. Each ingredient plays a specific role, so here’s what to grab and why it matters.
- 3 tablespoons unsalted butter (plus extra for greasing the pan) — Butter adds richness and helps keep the treats from getting rock-hard. I use unsalted so I can control the salt level, but salted works fine if that’s what you have. Just skip any extra salt in the recipe.
- 1 package (10 ounces) regular marshmallows (about 40 large marshmallows) — Mini marshmallows melt faster, but regular ones work great too. The key is low heat and patience. If you rush this step, you’ll end up with scorched marshmallows that taste bitter. Trust me, I’ve done it.
- 6 cups crispy rice cereal (like Kellogg’s Rice Krispies) — The brand matters more than you’d think. Generic versions sometimes get stale faster or don’t hold their crunch as well. I’ve tested a few, and Kellogg’s gives the best texture. If you need a gluten-free option, most crispy rice cereals are naturally gluten-free, but double-check the label.
- 1 cup candy corn (about half a standard 16-ounce bag) — This is where the magic happens. Regular candy corn works best—avoid the “autumn mix” with the little pumpkins because those have a different texture and don’t distribute as evenly. Fresh candy corn is softer and folds in better. If your bag has been sitting in the pantry since last Halloween, it might be too hard. In that case, give it a rough chop before adding.
- ¼ teaspoon salt (optional but recommended) — A tiny pinch of flaky salt on top right after pressing balances all that sweetness. It’s not traditional, but it’s one of those little touches that makes people ask, “What did you do differently?”
That’s the whole list. No weird ingredients, no specialty items. You probably have most of this already, especially if you’ve made regular crispy treats before. The candy corn is the only seasonal addition, and it shows up in stores around late August or early September. I usually grab a few extra bags when I see them because they disappear fast once October hits.
One note on substitutions: If you want to make these dairy-free, use a plant-based butter stick (not the spreadable kind in a tub, which has too much water). The texture will be slightly different, but still delicious. I’ve also tried using vegan marshmallows, and they work, though they tend to be a little less stretchy. Just keep an eye on them while they melt.
Equipment Needed
You don’t need much for this recipe—that’s part of the appeal. But having the right tools makes the process smoother and keeps you from burning yourself on hot sugar. Here’s what I use:
- Large pot or Dutch oven (at least 4 quarts) — You need room to stir the marshmallows and cereal without spilling over the sides. A heavy-bottomed pot distributes heat more evenly and reduces the chance of scorching.
- Rubber spatula (heat-resistant) — This is non-negotiable. A wooden spoon works, but the marshmallow mixture sticks to it like crazy. A silicone spatula scrapes the sides clean and makes folding the cereal way easier.
- 9×13-inch baking dish — This gives you the perfect thickness—not too thin, not too thick. If you only have a 9×9-inch pan, the treats will be taller and need a few extra minutes to set before cutting.
- Parchment paper — Line your pan with parchment, leaving a little overhang on two sides. This creates handles that let you lift the whole block out for clean cutting. Wax paper doesn’t work here—it’ll stick and tear.
- Sharp knife or bench scraper — A serrated knife works best for cutting clean squares without squishing them. A bench scraper is even better because it cuts straight down without dragging the sticky edges.
- Measuring cups and spoons — For the butter, cereal, and salt. Eyeballing works for some recipes, but here the ratios matter for texture.
If you don’t have a 9×13-inch dish, you can use a rimmed baking sheet. The treats will be thinner, so reduce the setting time by about 5 minutes. I’ve also used a cast iron skillet in a pinch—just grease it well and press the mixture in while it’s still warm. It gives the edges a slightly crispier texture that some people actually prefer.
One budget-friendly tip: Skip the fancy silicone spatula and use a regular metal spoon coated with nonstick spray. It’s not as elegant, but it works. Just be careful not to scratch your pot.
Preparation Method
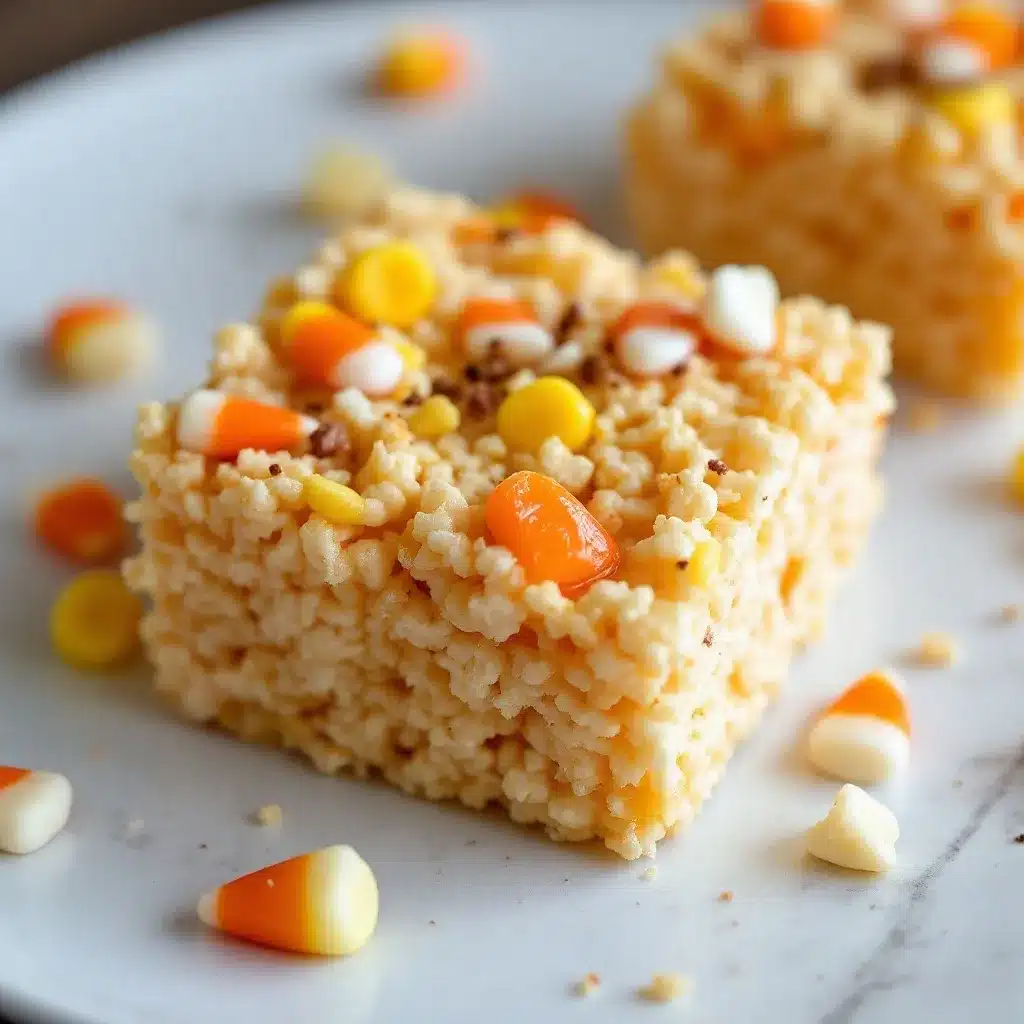
This comes together fast, so read through the steps once before you start. Once the marshmallows melt, you’re on the clock—you don’t want to be hunting for the cereal while the mixture cools and stiffens.
- Prep your pan — Line a 9×13-inch baking dish with parchment paper, leaving about 2 inches of overhang on the long sides. Lightly grease the parchment and the exposed sides of the pan with butter or nonstick spray. This step seems small, but it’s the difference between lifting out perfect squares and fighting with stuck-on bits.
- Melt the butter — Place your large pot over medium-low heat and add the 3 tablespoons of butter. Let it melt slowly, swirling the pan occasionally. You want it fully liquid but not bubbling or browning. If you see it start to foam aggressively, turn the heat down. Brown butter adds a nutty flavor that some people love, but for this recipe, we want the butter to stay neutral so the candy corn flavor shines.
- Add the marshmallows — Dump the entire bag of marshmallows into the melted butter. Stir constantly with your rubber spatula, scraping the bottom and sides. The marshmallows will puff up, collapse, and eventually turn into a smooth, glossy liquid. This takes about 5 to 7 minutes. Don’t walk away—if the heat is too high, the marshmallows will turn brown and develop a weird, plasticky taste. Low and slow is the way.
- Remove from heat and add cereal — Once the marshmallows are completely smooth with no lumps, take the pot off the burner. Pour in the 6 cups of crispy rice cereal all at once. Fold gently, using a cutting motion with your spatula, until the cereal is evenly coated. Don’t overmix—you want some marshmallow pockets, not a uniform paste. Overmixing crushes the cereal and makes the treats dense instead of airy.
- Fold in the candy corn — Add 1 cup of candy corn and fold it in gently. You want the pieces distributed throughout, not all clustered in one spot. Work quickly here—the mixture cools fast, and cold marshmallow doesn’t like to cooperate. If it starts getting stiff, you can pop the pot back on the lowest heat for 30 seconds to loosen it up.
- Press into the pan — Scrape the mixture into your prepared pan. Here’s the trick: don’t use your hands directly, because this stuff is hot and sticky. Lightly grease another piece of parchment paper or a silicone spatula with butter or nonstick spray, then press the mixture into an even layer. Apply firm, even pressure—you want it compact enough to hold together but not so compressed that it turns into a brick. Aim for an even thickness across the whole pan.
- Optional salt sprinkle — While the surface is still warm, sprinkle a tiny pinch of flaky salt over the top. This is a small step, but it makes a big difference in balancing the sweetness. I use Maldon, but any flaky salt works.
- Let set and cut — Let the treats cool at room temperature for at least 30 minutes. Don’t rush this—cutting too early gives you a sticky, misshapen mess. Once set, lift the whole block out using the parchment overhang. Place on a cutting board and use a sharp knife to cut into squares. I usually go for 12 large squares or 24 smaller ones, depending on the crowd. Wipe the knife clean between cuts for neater edges.
The whole process, from melting to pressing, takes about 15 minutes. The waiting is the hardest part, but it’s worth it. When you bite into one, you’ll feel that soft marshmallow give way to the firm chew of candy corn, and you’ll know exactly why I love this recipe so much.
Cooking Tips & Techniques
I’ve made these treats more times than I can count, and I’ve messed up plenty along the way. Here are the lessons I learned the hard way so you don’t have to.
Low heat is your friend. The biggest mistake people make is cranking up the heat to melt the marshmallows faster. I did this once, thinking I was being efficient, and ended up with a pot of brown, bitter goo that smelled like burnt sugar. Marshmallows are mostly sugar and gelatin, and sugar burns easily. Keep the burner on medium-low and be patient. If you see steam rising, the heat is too high.
Don’t skimp on the butter. The box recipe calls for 3 tablespoons, and I’ve tried cutting it to 2 to save a few calories. Bad idea. The treats came out dry and crumbly, and they went stale within a day. Butter isn’t just for flavor—it’s what keeps the treats soft and pliable. Use the full amount.
Fresh candy corn matters. I bought a bag on clearance once, thinking I was being smart. It was from the previous Halloween, and the candy corn had turned into little rocks. When I folded it into the marshmallow mixture, it stayed hard and didn’t soften at all. The final treats had these unpleasant crunchy bits that didn’t belong. If your candy corn feels stiff in the bag, chop it roughly before adding, or just buy a fresh bag.
Press gently but firmly. This is a balance. Press too hard, and you get dense, flat treats that feel more like a granola bar. Press too lightly, and they fall apart when you try to cut them. I use a piece of greased parchment and press until the surface is even and the mixture feels compact but still has some give. You’ll develop a feel for it after one or two batches.
Timing is everything. Once the marshmallows are melted, you have about 10 minutes before the mixture becomes too stiff to work with. Have your pan prepped, your cereal measured, and your candy corn ready before you start. If you’re scrambling to find the measuring cup while the marshmallow cools, you’ll end up with a lumpy, uneven mess.
One more thing: if you’re making these for a party, double the batch. Seriously. They disappear fast, and having a second pan means you actually get to eat one yourself.
Variations & Adaptations
This recipe is a great base for experimenting. I’ve tried a few twists over the years, and some of them were surprisingly good. Here are my favorites:
Chocolate Drizzle — After pressing the treats into the pan, melt about ½ cup of chocolate chips with 1 teaspoon of coconut oil. Drizzle it over the top in zigzag patterns, then let it set before cutting. The chocolate adds a rich counterpoint to the sweet candy corn, and it makes the treats look fancy with almost zero effort. I’ve brought these to potlucks and had people ask if I bought them from a bakery.
Peanut Butter Swirl — Melt ¼ cup of peanut butter with the butter and marshmallows. The peanut butter adds a savory, salty element that cuts through the sweetness. Use creamy peanut butter for a smooth texture, or crunchy if you want extra texture. Just know that the peanut butter will make the treats slightly softer, so they might need an extra 10 minutes to set.
Gluten-Free Version — Most crispy rice cereals are naturally gluten-free, but some brands add malt flavoring that contains gluten. Look for certified gluten-free cereal if that’s a concern. The recipe works exactly the same—no adjustments needed. I’ve tested this with a friend who has celiac disease, and she couldn’t tell the difference.
Spooky Mix-In — Replace half the candy corn with candy pumpkins or candy corn ghosts. The different shapes and colors make the treats look even more festive. I did this for a Halloween party last year, and the kids went crazy for the little orange pumpkins peeking out of the marshmallow.
Salty-Sweet Combo — Sprinkle crushed pretzels over the top before pressing. The salt and crunch from the pretzels balance the sweetness perfectly. Use about ½ cup of crushed pretzels, pressing them gently into the surface. This is my personal favorite variation—I can’t stop eating them.
If you’re feeling adventurous, try mixing in a handful of mini chocolate chips along with the candy corn. The chocolate melts slightly from the warmth of the marshmallow, creating little pockets of fudge throughout. It’s not traditional, but it’s delicious.
Serving & Storage Suggestions
These treats are best at room temperature, served on a platter or in a festive bowl. I like to arrange them on a white plate so the orange, yellow, and white colors pop. For Halloween parties, I sometimes stack them on a tiered tray with other treats like refreshing cucumber mint green tea cooler for a fun contrast—sweet and cool all at once.
They pair surprisingly well with a cup of coffee or a glass of cold milk. The bitterness of the coffee cuts through the sweetness, while the milk makes the marshmallow even softer. If you’re serving them at a party, set out a pitcher of cold milk or hot apple cider alongside.
For storage, place the treats in an airtight container at room temperature. They’ll stay fresh for up to 3 days, though they’re best within the first 24 hours. After that, the candy corn starts to soften and lose its distinct chew, and the cereal loses some crunch. If you need to keep them longer, layer them between sheets of parchment paper in the container to prevent sticking.
You can freeze these treats for up to 2 months. Wrap each square individually in plastic wrap, then place them in a freezer-safe bag. To thaw, leave them at room temperature for about 30 minutes. The texture won’t be quite as good as fresh—the cereal might be a little softer—but they’re still delicious. I’ve frozen them for Halloween parties and pulled them out the morning of without anyone noticing.
One thing I’ve learned: don’t refrigerate these. The cold makes the marshmallow turn hard and rubbery, and the candy corn becomes tough. Room temperature is the sweet spot. If you live in a humid climate, add an extra tablespoon of butter to the recipe—it helps prevent the treats from getting sticky on the surface.
Nutritional Information & Benefits
Let’s be real—these are a treat, not a health food. But knowing what’s in them helps you enjoy them mindfully. Here’s the estimated nutrition for one large square (based on 12 servings per batch):
- Calories: Approximately 220
- Total Fat: 7g
- Saturated Fat: 4g
- Carbohydrates: 40g
- Sugar: 24g
- Protein: 2g
- Sodium: 180mg
The main ingredients—marshmallows and candy corn—are mostly sugar, so this isn’t something you’d eat every day. But the crispy rice cereal does provide a small amount of iron and B vitamins, and the butter adds a touch of vitamin A. It’s not much, but it’s something.
If you’re watching your sugar intake, you can reduce the candy corn to ½ cup. The treats will still have that festive look, just with fewer concentrated pockets of sweetness. I’ve also tried using a lower-sugar cereal, but the texture suffered—it got soggy faster. Sometimes the original version is just the best version.
For those with dietary restrictions, note that marshmallows typically contain gelatin, which is not vegetarian or vegan. There are vegan marshmallow brands available (like Dandies), and they work well in this recipe. Also, candy corn is usually gluten-free and dairy-free, but check the label to be safe—some brands add trace amounts of wheat starch.
My personal take? These are for special occasions. Halloween, birthdays, movie nights with the kids. They’re not everyday food, and that’s okay. Part of what makes them special is that they’re a little indulgence. Enjoy them, share them, and don’t stress about the numbers.
Conclusion
These Easy Candy Corn Rice Krispie Treats are exactly what a good recipe should be—simple, fun, and completely satisfying. They take almost no time, use ingredients you probably already have, and they bring a smile to everyone who tries them. There’s something about that tricolor look and the soft-meets-chewy texture that just works.
I love that this recipe doesn’t try to be anything it’s not. It’s not fancy, it’s not complicated, and it doesn’t pretend to be healthy. It’s just a really good treat that happens to be perfect for Halloween. Or Tuesday. Or any day you need a little sweetness in your life.
If you make these, I’d love to hear how they turn out. Did you add chocolate? Skip the salt? Double the candy corn? Drop a comment below and let me know your twist. And if you’re looking for more easy, crowd-pleasing recipes, check out my easy slow cooker honey garlic chicken meal prep bowls or creamy vegan chocolate avocado pudding for something completely different. Happy cooking, and don’t forget to save yourself a square before they disappear!
Frequently Asked Questions
Can I use mini marshmallows instead of regular ones?
Yes, and they actually melt faster. Use about 4 cups of mini marshmallows (a 10-ounce bag) instead of the large ones. The rest of the recipe stays the same.
Why did my treats turn out hard?
Two common reasons: you overcooked the marshmallows (the heat was too high), or you pressed the mixture too firmly into the pan. Keep the heat low and press gently for soft, chewy treats.
Can I use a different cereal?
Absolutely. Fruity pebbles, cocoa rice cereal, or even corn flakes work. Just know that different cereals have different textures and sweetness levels, so the final result might vary. I’ve used fruity pebbles for a colorful twist that kids love.
How do I keep the treats from sticking to the knife when cutting?
Spray your knife with nonstick cooking spray or rub it with a little butter. Wipe the blade clean between cuts for the neatest edges. A bench scraper also works great because it doesn’t drag the sticky edges.
Can I make these ahead of time for a party?
Yes, but no more than 2 days in advance. Store them in an airtight container at room temperature. If you need to make them further ahead, freeze them (wrapped individually) and thaw the morning of your event.
Pin This Recipe!
Easy Candy Corn Rice Krispie Treats: Best 20-Minute Recipe
These Easy Candy Corn Rice Krispie Treats are a quick and fun Halloween treat that combines soft marshmallow with chewy candy corn for a delightful texture contrast. Ready in just 20 minutes, they’re perfect for parties, classroom treats, or a nostalgic snack.
- Prep Time: 10 minutes
- Cook Time: 10 minutes
- Total Time: 20 minutes
- Yield: 12 servings 1x
- Category: Dessert
- Cuisine: American
Ingredients
- 3 tablespoons unsalted butter (plus extra for greasing the pan)
- 1 package (10 ounces) regular marshmallows (about 40 large marshmallows)
- 6 cups crispy rice cereal (like Kellogg’s Rice Krispies)
- 1 cup candy corn (about half a standard 16-ounce bag)
- ¼ teaspoon salt (optional but recommended)
Instructions
- Prep your pan: Line a 9×13-inch baking dish with parchment paper, leaving about 2 inches of overhang on the long sides. Lightly grease the parchment and the exposed sides of the pan with butter or nonstick spray.
- Melt the butter: Place your large pot over medium-low heat and add the 3 tablespoons of butter. Let it melt slowly, swirling the pan occasionally. You want it fully liquid but not bubbling or browning.
- Add the marshmallows: Dump the entire bag of marshmallows into the melted butter. Stir constantly with your rubber spatula, scraping the bottom and sides. The marshmallows will puff up, collapse, and eventually turn into a smooth, glossy liquid. This takes about 5 to 7 minutes. Don’t walk away—if the heat is too high, the marshmallows will turn brown and develop a weird, plasticky taste. Low and slow is the way.
- Remove from heat and add cereal: Once the marshmallows are completely smooth with no lumps, take the pot off the burner. Pour in the 6 cups of crispy rice cereal all at once. Fold gently, using a cutting motion with your spatula, until the cereal is evenly coated. Don’t overmix—you want some marshmallow pockets, not a uniform paste.
- Fold in the candy corn: Add 1 cup of candy corn and fold it in gently. You want the pieces distributed throughout, not all clustered in one spot. Work quickly here—the mixture cools fast, and cold marshmallow doesn’t like to cooperate. If it starts getting stiff, you can pop the pot back on the lowest heat for 30 seconds to loosen it up.
- Press into the pan: Scrape the mixture into your prepared pan. Lightly grease another piece of parchment paper or a silicone spatula with butter or nonstick spray, then press the mixture into an even layer. Apply firm, even pressure—you want it compact enough to hold together but not so compressed that it turns into a brick.
- Optional salt sprinkle: While the surface is still warm, sprinkle a tiny pinch of flaky salt over the top.
- Let set and cut: Let the treats cool at room temperature for at least 30 minutes. Once set, lift the whole block out using the parchment overhang. Place on a cutting board and use a sharp knife to cut into squares. I usually go for 12 large squares or 24 smaller ones.
Notes
Use fresh candy corn for best texture. If candy corn is hard, chop it roughly before adding. Keep heat low when melting marshmallows to avoid burning. Press mixture gently but firmly for best texture. Store in an airtight container at room temperature for up to 3 days. Can be frozen for up to 2 months.
Nutrition
- Serving Size: 1 large square
- Calories: 220
- Sugar: 24
- Sodium: 180
- Fat: 7
- Saturated Fat: 4
- Carbohydrates: 40
- Protein: 2
Keywords: candy corn rice krispie treats, Halloween treats, easy dessert, no-bake dessert, marshmallow treats


