I am staring at a pile of black sugar cookie dough and realizing I have exactly forty minutes before the neighbors’ kids arrive for their Halloween party. It’s not panic, exactly. It’s more like a focused, high-stakes culinary calculation. The oven is already preheated to 350°F, humming that low, eager note that usually precedes good things. I want these cookies to be crisp, not chewy. Everyone loves the soft, cakey sugar cookie, but let’s face it, for a Halloween party treat that needs to survive being handled by small, sticky hands, crisp is king. Crunchy. Snap-worthy. Visually striking.
Right now, I have everything except the final dusting of edible glitter, which is currently sitting in my pantry behind the expired baking powder. I need to make sure the black color is deep enough to look like a silhouette against the white icing, but not so dark that it tastes like charcoal. That’s the balance. That’s the trick. I roll the first cat shape. The dough holds its line. It’s perfect. I slide the tray into the oven and watch through the glass as the edges just barely start to set. This isn’t just about feeding kids. It’s about creating that moment of delight when they bite down and hear the crackle.
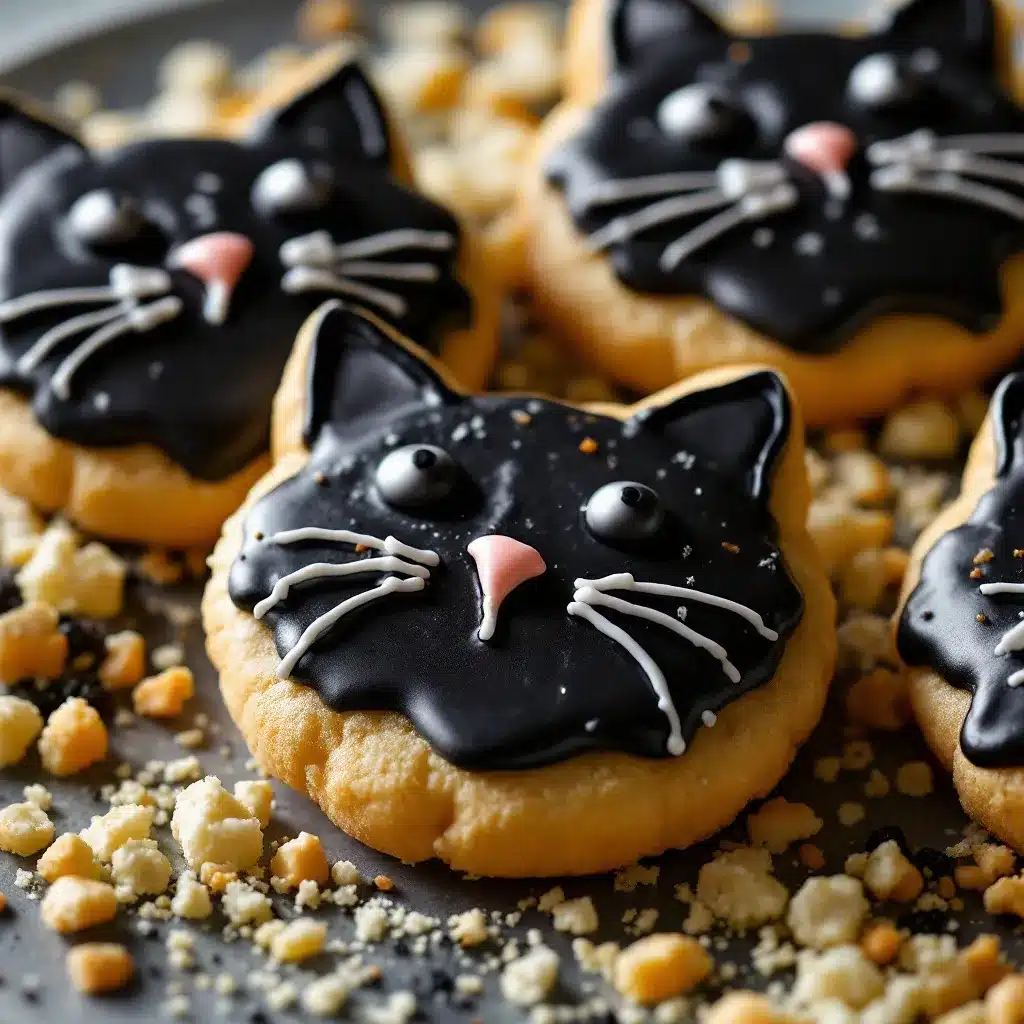
There is something deeply satisfying about turning simple pantry staples into spooky little icons. I’ve made these cookies for years, tweaking the ratio of cornstarch to flour until I got that specific shatter that happens when you bite into them. It’s the kind of baking that feels less like cooking and more like sculpting with edible clay. And honestly, seeing the finished product lined up on a cooling rack, with their bright yellow eyes and white whiskers, makes the flour-covered counter worth it. I just hope I made enough.
Why You’ll Love This Recipe
Let’s be real for a second. Not all sugar cookies are created equal, and I’ve spent enough years in the kitchen to know the difference between a sad, flat disc and a cookie that actually has personality. These crispy black cat Halloween sugar cookies are the result of trial, error, and a lot of tasting. I’m not just giving you a recipe; I’m giving you a tested system that guarantees success, even if you’re not a professional baker. Here is why this recipe earns its spot on your holiday baking list:
- Quick & Easy: You can have these cookies from start to finish in under 45 minutes of active time. No chilling overnight required if you use the freezer hack I’ll share. Perfect for those last-minute Halloween prep rushes or busy weeknights when you need a win.
- Simple Ingredients: You likely have everything you need in your kitchen right now. Flour, sugar, butter, eggs, and black food coloring. No fancy grocery trips needed. This is accessible baking at its finest.
- Perfect for Parties: Whether it’s a trick-or-treat drop-off, a classroom party, or a spooky dinner party, these cookies are the ultimate crowd-pleaser. They are sturdy, easy to transport, and look incredible on a platter.
- Crowd-Pleaser: Kids love the shape, and adults appreciate the crisp texture. It’s that rare treat that satisfies both the sweet tooth and the desire for a bit of crunch. Plus, the black and white color scheme is timeless.
- Unbelievably Delicious: The texture is next-level. Unlike soft sugar cookies that can get soggy, these maintain their snap for days. The flavor is buttery and sweet, with a hint of vanilla that lets the visual drama take center stage.
What makes this recipe different from the rest? It’s the addition of a touch of cornstarch and a slightly higher baking temperature. This combination encourages spreading just enough to create those lacy, crispy edges while keeping the center firm. It’s a technique I picked up from a pastry chef friend who swore by it for holiday cookies. It’s not just another version of a sugar cookie; it’s the best version. It’s the kind that makes you close your eyes after the first bite and appreciate the crunch. It’s comfort food reimagined for the season, with the same soul-soothing satisfaction but with a spooky twist.
What Ingredients You Will Need
This recipe relies on simple, wholesome ingredients to deliver bold flavor and satisfying texture without the fuss. The key here is quality butter and reliable baking powder, as these are the leavening agents that create the crumb structure. You don’t need anything exotic, just standard pantry staples that you can trust to perform.
- All-purpose flour: 2 and 1/2 cups. This is the backbone of the cookie. I recommend using a brand like King Arthur, as it has consistent protein content which helps with structure.
- Unsalted butter: 1 cup (2 sticks), softened to room temperature. Softened is crucial. If it’s too cold, it won’t cream properly. If it’s melted, the cookies will spread too much.
- Granulated white sugar: 1 cup. This provides the sweetness and helps with the crispness. Brown sugar can make them too chewy, so stick to white for this specific texture.
- Eggs: 1 large egg, room temperature. This binds the dough and adds richness.
- Vanilla extract: 1 teaspoon. Pure vanilla is best here. I use Nielsen-Massey because the flavor is distinct and not artificial.
- Baking powder: 1 teaspoon. This gives the cookies a slight lift without making them cakey.
- Salt: 1/2 teaspoon. Essential for balancing the sweetness.
- Cornstarch: 2 tablespoons. This is the secret weapon. It tenderizes the cookie slightly while contributing to that crisp snap.
- Black gel food coloring: 1 to 2 tablespoons. Gel coloring is non-negotiable. Liquid food coloring will throw off the dough consistency and make it watery. I prefer Chefmaster for its intense pigment.
- White royal icing: For decorating. You can make this from scratch or use a pre-made mix for convenience.
- Yellow gel food coloring: A tiny amount to tint the white icing for the eyes.
- White sprinkles or edible glitter: Optional, for adding a bit of sparkle to the black fur.
If you need to substitute, you can use a gluten-free flour blend, but you may need to add a teaspoon of xanthan gum if it’s not included in your blend. For a dairy-free option, use a high-quality plant-based butter stick, though the texture might be slightly less crisp. Always look for firm, high-quality butter for the best results.
Equipment Needed
You don’t need a fancy kitchen to make these cookies. A few basic tools will get the job done efficiently.
- Stand mixer or hand mixer: Creaming the butter and sugar by hand is possible but tiring. A mixer ensures the mixture is light and fluffy, which is key for the texture.
- Cookie cutters: You’ll need a cat-shaped cutter. If you don’t have one, you can cut them freehand with a knife, but a cutter ensures uniformity. I recommend a small cat cutter, about 2 inches wide, so they are bite-sized.
- Baking sheets: Heavy-gauge aluminum sheets are best because they distribute heat evenly. Avoid dark non-stick pans if you can help it, as they can cause the bottoms to burn.
- Parchment paper: Always line your baking sheets. It prevents sticking and makes cleanup a breeze. It also helps with even baking.
- Piping bags or ziplock bags: For applying the royal icing. A small round tip (like a Wilton 1 or 2) gives you the most control for drawing whiskers and eyes.
- Cooling rack: Essential for cooling the cookies completely before decorating. If you decorate them while warm, the icing will melt and slide off.
If you don’t have a stand mixer, a sturdy whisk and some elbow grease will work. For the icing, if you don’t have piping bags, just snip the corner off a ziplock bag. It’s a budget-friendly hack that works perfectly. Just make sure your equipment is clean and dry, especially when making the icing, as any grease will prevent it from setting.
Preparation Method
- Cream the butter and sugar (2 minutes): In the bowl of a stand mixer fitted with the paddle attachment, beat the softened butter and granulated sugar on medium-high speed until the mixture is light, fluffy, and pale in color. This step is crucial for incorporating air, which helps the cookies spread evenly. If you’re doing this by hand, mix vigorously for about 3-4 minutes.
- Add wet ingredients (1 minute): Add the egg and vanilla extract to the butter mixture. Beat on medium speed until fully combined. Scrape down the sides of the bowl with a spatula to ensure everything is incorporated evenly.
- Combine dry ingredients: In a separate medium bowl, whisk together the flour, baking powder, cornstarch, and salt. This ensures the leavening agent is distributed evenly, preventing bitter spots.
- Mix dry into wet (1-2 minutes): Gradually add the dry ingredients to the wet ingredients on low speed. Mix just until the dough comes together. Do not overmix, or the cookies will become tough. The dough should be stiff but pliable.
- Add black food coloring: Add the black gel food coloring to the dough. Mix on low speed until the color is uniform. You may need to add a bit more coloring if you want a deeper black, but go slow. Gel coloring is potent. The dough should be a uniform dark gray/black.
- Chill the dough (30 minutes): Divide the dough into two discs and wrap them tightly in plastic wrap. Refrigerate for at least 30 minutes. Chilling firms up the butter, which prevents the cookies from spreading too much in the oven. If you’re in a hurry, you can freeze them for 15 minutes.
- Preheat oven and prepare sheets: Preheat your oven to 350°F (175°C). Line two large baking sheets with parchment paper.
- Roll and cut the dough: On a lightly floured surface, roll out one disc of dough to about 1/4 inch thickness. Use the cat-shaped cookie cutter to cut out shapes. Place them on the prepared baking sheets, leaving about 1 inch of space between each cookie. Reroll the scraps to cut more cookies.
- Bake (10-12 minutes): Bake the cookies for 10-12 minutes, or until the edges are set and slightly golden. They should still look soft in the center but will firm up as they cool. Rotate the pans halfway through baking for even browning.
- Cool completely: Let the cookies cool on the baking sheet for 5 minutes, then transfer them to a wire rack to cool completely. This is important; if they are even slightly warm, the icing will melt.
- Prepare the royal icing: While the cookies cool, make your white royal icing. Beat egg whites (or meringue powder mixed with water) with powdered sugar until stiff peaks form. Divide a small amount of icing and tint it yellow for the eyes.
- Decorate: Pipe the white icing onto the cooled cookies to create the face. Use the white icing for the muzzle, whiskers, and eye outlines. Use the yellow icing for the pupils. Let the icing dry completely, which can take a few hours.
How do I prevent the black color from bleeding?
Use gel coloring, not liquid. Liquid coloring adds too much water to the dough, which can cause the color to spread during baking. Gel coloring is concentrated and mixes into the dough without altering the consistency.
Can I freeze the dough?
Yes! You can freeze the dough discs for up to 3 months. Thaw them in the refrigerator overnight before rolling and cutting. This is great for meal prep.
Why are my cookies flat?
This usually happens if the butter was too warm when you started mixing, or if the dough wasn’t chilled enough before baking. Make sure your butter is softened but not melted, and chill the dough for at least 30 minutes.
How do I make the icing smooth?
Consistency is key. The icing should be like thick honey. If it’s too thick, add a drop of water. If it’s too thin, add more powdered sugar. Practice your piping on a piece of parchment paper first to get the hang of it.
What if I don’t have a cat cutter?
You can cut them freehand with a knife or even a pizza cutter. Draw a simple cat shape on a piece of paper and use it as a template. Or, just cut simple circles and use the icing to draw the cat face. The shape is less important than the decoration.
Cooking Tips & Techniques
Getting the texture right is all about temperature control and timing. One common mistake I see is overbaking. These cookies continue to cook on the hot pan after you take them out of the oven. If they look fully set in the pan, they will be hard as rocks once cooled. Pull them when the edges are just starting to turn a very light golden brown, but the centers still look slightly soft.
Another tip is to keep your dough cold. If it gets too warm while you’re cutting shapes, pop the scraps back in the fridge for a few minutes. Warm dough sticks to the cutter and spreads in the oven. I usually keep one disc in the fridge while I work with the other. It’s a small step that makes a huge difference in the final shape.
When it comes to the icing, practice makes perfect. If your whiskers look wobbly, don’t worry. You can fix them with a toothpick while the icing is still wet. Drag the toothpick through the icing to smooth out any bumps. And don’t be afraid to layer your icing. If you want depth in the eyes, let the white outline dry slightly before adding the yellow pupil. It creates a more professional look.
Also, consider your kitchen humidity. If it’s a rainy day, the cookies might take longer to crisp up. You can leave them in the turned-off oven with the door slightly ajar for a few minutes after baking to dry them out further. This is a trick I use for macarons, but it works wonders for crisp sugar cookies too.
Variations & Adaptations
While the classic black and white cat is iconic, there are plenty of ways to tweak this recipe to suit different tastes or dietary needs.
- Orange Cats: Instead of black food coloring, use orange gel coloring. These orange cats look great with green icing eyes. It’s a fun twist for autumn or Halloween.
- Gluten-Free: Swap the all-purpose flour for a 1-to-1 gluten-free baking blend. Ensure your baking powder is certified gluten-free. The texture might be slightly more crumbly, so handle them gently.
- Vegan: Use plant-based butter and replace the egg with a flax egg (1 tablespoon ground flaxseed mixed with 3 tablespoons water). You may need to add an extra teaspoon of flour to compensate for the moisture.
- Chocolate Icing: For a spooky effect, use black royal icing for the entire face and white icing for the eyes and whiskers. It creates a high-contrast, dramatic look.
- Sparkle Dust: After piping the white icing, immediately sprinkle edible glitter or silver dust over it. It adds a magical, shimmering effect that kids love.
I once tried making these with almond flour for a nutty flavor, but the texture was too dense. I stuck to the all-purpose flour for that perfect snap. If you’re allergic to nuts, just avoid using almond flour or almond extract. Always check your food coloring labels to ensure they are vegan and gluten-free if that’s a concern for your guests.
Serving & Storage Suggestions
These cookies are best served at room temperature. Cold cookies can sometimes lose their crispness, and warm cookies might melt the icing. Arrange them on a platter lined with black parchment paper for a spooky presentation. You can add some fake spiderwebs or mini pumpkins around the edges for a festive touch.
For storage, keep the cookies in an airtight container at room temperature. They will stay fresh and crisp for up to 5 days. If you’re storing them with the icing, place parchment paper between layers to prevent the decorations from sticking together. If the icing gets soft due to humidity, you can crisp them up by placing them in a 200°F oven for 5 minutes.
Do not refrigerate these cookies unless necessary, as the moisture in the fridge can make them soggy. If you must freeze them, freeze the un-iced cookies first. Once thawed, ice them and let the icing dry. This preserves the texture best. The flavors actually meld nicely after a day or two, making them even better if you make them ahead of time.
Nutritional Information & Benefits
While these cookies are definitely a treat, they are relatively balanced compared to other desserts. A single cookie contains approximately 120 calories, with 6 grams of fat, 15 grams of carbohydrates, and 1 gram of protein. The butter provides fat-soluble vitamins, and the eggs offer protein. However, they are high in sugar, so enjoy in moderation.
For those watching their sugar intake, you can reduce the sugar in the dough by 1/4 cup without significantly affecting the texture, though they may be less crisp. You can also use a sugar substitute in the icing, but note that it may not dry as hard. These cookies are naturally nut-free, making them safe for many school and office parties. Just always double-check your specific ingredients for allergens.
Conclusion
These crispy black cat Halloween sugar cookies are more than just a treat; they are a fun, creative project that brings joy to both the baker and the eater. The crisp texture, striking appearance, and simple ingredients make them a standout holiday dessert. I hope you try this recipe and make it your own. Feel free to experiment with different colors or decorations to match your Halloween vibe.
I always love seeing how people interpret my recipes. If you make these cookies, I’d love to see your creations! Share your photos on social media and tag me, or leave a comment below with your tips and tricks. Happy baking, and happy Halloween!
FAQs
Can I use liquid food coloring instead of gel?
It’s not recommended. Liquid food coloring adds too much water to the dough, which can make the cookies spread too much and lose their crisp texture. Gel coloring is concentrated and mixes in without altering the dough consistency.
How do I make the royal icing?
Whisk 2 egg whites (or 4 tablespoons meringue powder mixed with 6 tablespoons water) with 4 cups of powdered sugar until stiff peaks form. Add a few drops of vanilla extract for flavor. Divide and tint as needed.
Why are my cookies spreading too much?
This is usually due to butter that is too warm or dough that wasn’t chilled enough. Make sure your butter is softened but not melted, and chill the dough for at least 30 minutes before rolling.
Can I make these cookies ahead of time?
Yes! You can bake and store the un-iced cookies for up to a week. Ice them the day you plan to serve them to prevent the icing from getting soft.
What if I don’t have a cat cookie cutter?
You can cut them freehand with a knife or use a simple circle cutter and draw the cat face with icing. The shape is less important than the decoration. You can also find printable templates to trace.
For more delicious party treats, check out these creamy vegan chocolate avocado pudding or these easy Mediterranean stuffed mini peppers for a savory option.
Pin This Recipe!

Crispy Black Cat Halloween Sugar Cookies

These crispy black cat Halloween sugar cookies are a fun, spooky party treat that combines simple pantry staples with a unique crisp texture. Perfect for Halloween, they feature a buttery snap and are decorated with royal icing to create striking cat silhouettes.
- Prep Time: 30 minutes
- Cook Time: 12 minutes
- Total Time: 45 minutes
- Yield: Approximately 24 cookies 1x
- Category: Dessert
- Cuisine: American
Ingredients
- 2 1/2 cups all-purpose flour
- 1 cup unsalted butter, softened to room temperature
- 1 cup granulated white sugar
- 1 large egg, room temperature
- 1 teaspoon vanilla extract
- 1 teaspoon baking powder
- 1/2 teaspoon salt
- 2 tablespoons cornstarch
- 1 to 2 tablespoons black gel food coloring
- White royal icing (for decorating)
- Yellow gel food coloring (for eyes)
- White sprinkles or edible glitter (optional)
Instructions
- In a stand mixer fitted with the paddle attachment, beat the softened butter and granulated sugar on medium-high speed for 2 minutes until light, fluffy, and pale.
- Add the egg and vanilla extract, beating on medium speed for 1 minute until combined. Scrape down the sides of the bowl.
- In a separate bowl, whisk together the flour, baking powder, cornstarch, and salt.
- Gradually add the dry ingredients to the wet mixture on low speed, mixing just until the dough comes together (1-2 minutes). Do not overmix.
- Add the black gel food coloring and mix on low speed until the dough is a uniform dark color.
- Divide the dough into two discs, wrap in plastic wrap, and refrigerate for at least 30 minutes (or freeze for 15 minutes if in a hurry).
- Preheat oven to 350°F (175°C) and line baking sheets with parchment paper.
- On a lightly floured surface, roll out one disc of dough to 1/4 inch thickness. Cut out cat shapes and place on prepared sheets, leaving 1 inch of space between cookies.
- Bake for 10-12 minutes until edges are set and slightly golden. Rotate pans halfway through.
- Cool cookies on the sheet for 5 minutes, then transfer to a wire rack to cool completely.
- Prepare white royal icing by beating egg whites (or meringue powder) with powdered sugar until stiff peaks form. Tint a small portion yellow.
- Pipe white icing for the muzzle, whiskers, and eye outlines. Use yellow icing for pupils. Let dry completely.
Notes
Use gel food coloring instead of liquid to prevent the dough from becoming watery and spreading too much. Ensure butter is softened but not melted. Chill dough thoroughly to maintain shape. Cookies continue to cook on the hot pan after removal, so pull them when edges are just set but centers look slightly soft.
Nutrition
- Serving Size: 1 cookie
- Calories: 120
- Sugar: 10
- Sodium: 80
- Fat: 6
- Saturated Fat: 3.5
- Carbohydrates: 15
- Fiber: 0.5
- Protein: 1
Keywords: Halloween cookies, sugar cookies, black cat cookies, crispy cookies, party treats, holiday baking, royal icing


