The jar of Biscoff cookie butter had been staring at me from the pantry for three weeks. I bought it on a whim, thinking I’d spread it on toast or something, but honestly? It felt too precious for that. Then my neighbor texted me at 4 PM on a Tuesday—she was coming over in an hour with wine, and she’d just found out she was gluten-free. I had no dessert plan. I had a half-block of cream cheese, some heavy cream that was about to turn, and that lonely jar of cookie butter. My first thought was panic. My second thought was, wait—this could actually work.
I started pulling things out of the fridge without a real plan. Cream cheese, check. Sugar, check. Eggs, check. I grabbed the Biscoff cookies from the same pantry shelf—because if you’re using the spread, you might as well use the cookies for the crust, right? Within twenty minutes, I had a crust pressed into a pan, a silky filling whisked together, and ribbons of warm cookie butter swirling on top. The whole thing smelled like warm spice and caramelized sugar. I slid it into the oven, crossed my fingers, and hoped for the best.
When the bars came out, the edges were set but the center had that perfect, slight jiggle. I let them cool on the counter while my neighbor and I talked, and by the time she took her first bite, I knew we had something special. These Creamy Biscoff Cheesecake Bars with Cookie Butter Swirl are now my go-to for last-minute hosting, lazy Sunday baking, or just when I need a dessert that feels fancy without the fuss. They’re the kind of recipe you don’t plan for—they just show up and save the day.
Why You’ll Love This Recipe
Let me tell you why these bars have earned a permanent spot in my dessert rotation. I’ve tested this recipe six times (yes, six—my family was very supportive), and every single batch disappeared faster than I could say “cookie butter.”
What Makes These Bars So Good?
- Quick & Easy: From start to finish, these bars take about 45 minutes of active time. The oven does most of the work, and you don’t need a water bath or any fancy techniques.
- Simple Ingredients: You probably have most of this stuff already—cream cheese, sugar, eggs, vanilla. The only specialty item is the Biscoff spread, and honestly, it’s worth keeping a jar on hand for moments like this.
- Perfect for Any Occasion: Birthday party? Potluck? Tuesday night? These bars fit everywhere. They’re elegant enough to impress but unfussy enough to make on a whim.
- Crowd-Pleaser: I’ve served these to kids, adults, gluten-free friends, and serious dessert snobs. Everyone loves them. The Biscoff flavor is nostalgic without being overwhelming.
- Unbelievably Delicious: The texture is what gets me every time—creamy, dense, almost mousse-like in the center, with that crunchy cookie crust and those gorgeous ribbons of cookie butter on top. It’s next-level comfort food.
What sets this recipe apart from other cheesecake bars is the ratio. I spent a lot of time tweaking the cream cheese to heavy cream balance so the filling stays rich but not heavy. And that cookie butter swirl? It’s not just for looks—it adds a layer of caramelized, spiced sweetness that makes every bite interesting. This isn’t just another cheesecake bar recipe. It’s the one you’ll come back to again and again.
What Ingredients You Will Need
This recipe uses simple, pantry-friendly ingredients to create something that tastes way more complicated than it is. Here’s what you’ll need and why each one matters.
For the Crust
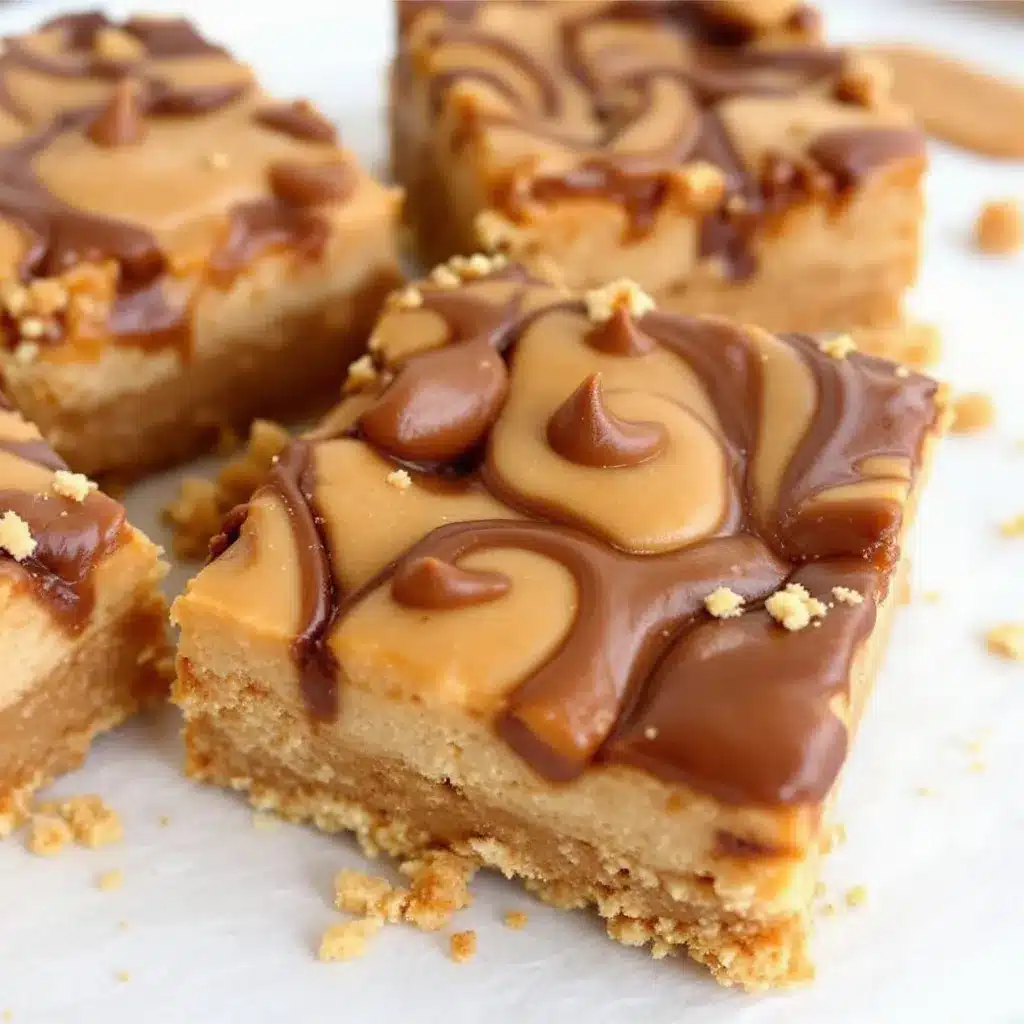
- 1 ½ cups Biscoff cookie crumbs (about 20-22 cookies, crushed fine) — I use a food processor for this, but a zip-top bag and rolling pin work too. The cookies add that signature spiced flavor and a buttery crunch that’s essential.
- 5 tablespoons unsalted butter, melted — This binds the crumbs together. I prefer unsalted so I can control the salt level, but salted works if you reduce the added salt elsewhere.
- 2 tablespoons granulated sugar — Just a little extra sweetness to balance the spice.
- Pinch of salt — Don’t skip this. Salt makes the crust taste more like a real cookie.
For the Cheesecake Filling
- 16 ounces cream cheese, softened to room temperature — Full-fat is non-negotiable here for that ultra-creamy texture. I recommend Philadelphia brand for consistent results. Let it sit out for at least an hour before starting.
- ½ cup granulated sugar — Sweet enough to balance the tangy cream cheese without being cloying.
- 2 large eggs, room temperature — Cold eggs can seize the batter and create lumps. Pop them in a bowl of warm water for 5 minutes if you forgot to take them out.
- ⅓ cup heavy cream, room temperature — This is my secret ingredient for a silky, mousse-like texture. It lightens the filling without making it airy.
- 1 teaspoon vanilla extract — Pure vanilla, not imitation. It rounds out the flavors beautifully.
- Pinch of salt — Enhances everything without making it salty.
For the Cookie Butter Swirl
- ⅓ cup Biscoff cookie butter spread (crunchy or smooth) — I prefer the crunchy version for little bits of cookie in the swirl, but smooth works great too. Warm it slightly (10-15 seconds in the microwave) so it’s easy to drizzle.
- 1 tablespoon heavy cream — This thins the spread just enough to create beautiful swirls without sinking into the batter.
If you’re looking for a gluten-free option, these bars are naturally gluten-free since Biscoff cookies are made with wheat flour—wait, actually they’re not. Biscoff cookies do contain wheat flour, so for a gluten-free version, use gluten-free speculoos cookies (like the ones from the brand “Lotus” gluten-free line) or make a crust with almond flour and melted butter. For a dairy-free adaptation, use dairy-free cream cheese and coconut cream instead of heavy cream. I’ve tested the dairy-free version and it works, though the texture is slightly less dense.
Equipment Needed
You don’t need a lot of fancy gear for these bars, which is part of why I love them. Here’s what you’ll need:
- 8×8-inch square baking pan — This is the perfect size for 9 generous bars. A 9×9 works too but the bars will be slightly thinner.
- Parchment paper — Line the pan with two overlapping strips so you can lift the whole block out easily. This is a game-changer for clean slicing.
- Food processor or zip-top bag and rolling pin — For crushing the cookies. A food processor gives the most consistent fine crumbs, but a bag and rolling pin work if you’re patient.
- Electric hand mixer or stand mixer — A hand mixer is perfect here. You want to beat the cream cheese until smooth, and doing it by hand is a workout I don’t recommend.
- Large mixing bowls — One for the crust, one for the filling.
- Spatula — For scraping every last bit of filling into the pan. A silicone spatula is best.
- Small microwave-safe bowl — For warming the cookie butter spread.
- Toothpick or skewer — For creating the swirl pattern. A butter knife works too, but a toothpick gives finer lines.
If you don’t have an 8×8 pan, you can use a 9-inch round cake pan or even a loaf pan (though the bars will be thicker and need a few extra minutes in the oven). I’ve also made these in a mini cheesecake pan for individual portions—just reduce the baking time to about 15-18 minutes.
Preparation Method
Alright, let’s get baking. Here’s the step-by-step process, complete with all the little details I’ve learned from making these bars more times than I can count.
- Preheat and prep the pan. Preheat your oven to 325°F (160°C). Line your 8×8-inch baking pan with two overlapping strips of parchment paper, leaving a 2-inch overhang on two opposite sides. This creates handles for lifting the bars out later. Lightly grease the parchment with butter or non-stick spray.
- Make the crust. In a food processor, pulse the Biscoff cookies until they become fine crumbs. You should have about 1 ½ cups. Transfer to a medium bowl, add the melted butter, 2 tablespoons sugar, and a pinch of salt. Stir with a fork until the mixture looks like wet sand and holds together when pressed. Pour the crumbs into the prepared pan and press them firmly into an even layer. I use the bottom of a flat measuring cup for this—it gives you a nice, compact crust. Bake for 8 minutes, then set aside to cool slightly while you make the filling. The crust will firm up as it bakes, giving you that perfect crunch.
- Beat the cream cheese. In a large mixing bowl, beat the softened cream cheese with an electric hand mixer on medium speed until completely smooth, about 2 minutes. Scrape down the sides and the bottom of the bowl with a spatula. This step is crucial—any lumps now will stay in the finished bars. I’ve learned this the hard way (lumpy cheesecake is sad cheesecake).
- Add the sugar and salt. Add the ½ cup sugar and pinch of salt to the cream cheese. Beat on medium speed until well combined, about 1 minute. Scrape the bowl again.
- Add the eggs one at a time. Crack one egg into the bowl and beat on low speed just until incorporated—about 15 seconds. Add the second egg and repeat. Over-mixing at this stage can incorporate too much air, which can cause cracks during baking. You want the batter to be smooth, not fluffy.
- Add the heavy cream and vanilla. Pour in the heavy cream and vanilla extract. Beat on low speed until just combined, about 20 seconds. The batter should look silky and smooth, like a thick pudding. Give it one final scrape with the spatula to make sure everything is evenly mixed.
- Pour the filling over the crust. Pour the cheesecake filling over the pre-baked crust. Use the spatula to spread it into an even layer, reaching all the corners. Tap the pan gently on the counter a few times to release any air bubbles.
- Make the cookie butter swirl. In a small microwave-safe bowl, warm the Biscoff cookie butter spread for about 10-15 seconds until it’s loose and drizzle-able. Stir in 1 tablespoon of heavy cream until smooth. Drizzle the mixture over the cheesecake filling in random lines and patterns. Use a toothpick or skewer to gently swirl the cookie butter into the batter. Don’t over-swirl—you want distinct ribbons, not a muddy mess. I like to do figure-eight patterns and then a few straight lines.
- Bake the bars. Place the pan in the preheated oven and bake for 35-40 minutes, or until the edges are set and the center has a slight jiggle when you gently shake the pan. It should look almost set but still wobble a bit in the very middle. This jiggle is your friend—it means the bars will be creamy, not dry. If the top starts browning too quickly (which can happen with the cookie butter), tent the pan loosely with foil after 25 minutes.
- Cool completely. Remove the pan from the oven and place it on a wire rack. Let the bars cool at room temperature for 1 hour. Then, transfer the pan to the refrigerator and chill for at least 4 hours, preferably overnight. This step is non-negotiable for clean slices and the best texture. I know it’s hard to wait, but trust me on this.
- Slice and serve. Once fully chilled, lift the bars out of the pan using the parchment handles. Place on a cutting board and use a sharp knife to slice into 9 even squares (3 rows by 3 rows). For the cleanest cuts, wipe the knife clean between each slice. Serve cold or at room temperature—both are delicious.
Cooking Tips & Techniques
After making these bars six times, I’ve collected a few tips that make a real difference. Let me share what I’ve learned—including my biggest failure.
Room temperature ingredients are not optional. I know, I know, everyone says this. But here’s why it matters for this specific recipe: cold cream cheese creates lumps that are nearly impossible to beat out completely, and cold eggs can cause the batter to curdle. The result? A grainy, uneven texture. I once tried to rush this step and ended up with bars that had tiny lumps throughout. They still tasted good, but the texture was off. Set everything out at least an hour before you start.
Don’t over-mix the batter. This is the most common mistake I see with cheesecake. Over-mixing incorporates too much air, which causes the bars to puff up in the oven and then collapse, creating cracks. Mix on low speed and stop as soon as each ingredient is incorporated. The batter should be smooth but not fluffy.
The jiggle test is your best friend. Instead of relying solely on bake time, use the jiggle test. Gently shake the pan—the edges should be firm and set, but the center should wobble slightly. It will continue to set as it cools. Over-baking is the #1 cause of dry, crumbly cheesecake bars. I’ve over-baked a batch before (I got distracted by a phone call), and the texture was more like a dry cake than creamy cheesecake. Learn from my mistake.
Chill time is essential. I know you want to eat these immediately. I’ve been there. But cutting into warm cheesecake bars is a guaranteed way to get a messy, gooey disaster. The bars need at least 4 hours in the fridge to fully set. Overnight is even better. The texture becomes denser and creamier, and the flavors meld together beautifully.
Multitasking tip: While the crust bakes (only 8 minutes), you can prep your cream cheese and eggs. This saves a little time and keeps things moving. Also, warm the cookie butter while the filling is being poured—it’s one less step at the end.
Variations & Adaptations
One of the best things about this recipe is how adaptable it is. Here are some variations I’ve tried and loved.
Chocolate Biscoff Cheesecake Bars
Add 2 tablespoons of cocoa powder to the crust mixture and ¼ cup melted dark chocolate to the filling. The chocolate and Biscoff flavors are a match made in dessert heaven. I made this version for a friend’s birthday and it was gone in 10 minutes.
Vegan / Dairy-Free Version
Use dairy-free cream cheese (I like the brand “Miyoko’s” for its creamy texture) and full-fat coconut cream instead of heavy cream. For the crust, use vegan butter or coconut oil. The texture is slightly less dense but still delicious. I tested this for a friend who’s vegan and she said it was the best cheesecake she’d had in years.
Mini Cheesecake Bites
Line a 12-cup muffin tin with paper liners. Press about 1 ½ tablespoons of crust mixture into each cup, then fill with cheesecake batter and swirl. Bake for 15-18 minutes. These are perfect for parties or portion control (or both).
Flavor Twists
Swap the Biscoff for speculoos or ginger snap cookies for a slightly different spice profile. Add a teaspoon of cinnamon or pumpkin pie spice to the filling for a fall-inspired version. Or, for a tropical twist, swirl in some passion fruit curd instead of cookie butter—the tangy fruit pairs beautifully with the creamy cheesecake.
No-Bake Version
If you don’t want to turn on the oven, you can make a no-bake version. Use the same crust (bake it for 8 minutes or just press it into the pan and chill). For the filling, beat 8 ounces cream cheese with ¼ cup sugar, then fold in 1 cup of whipped heavy cream (stiff peaks). Swirl in the cookie butter and chill for at least 6 hours. The texture is lighter and mousse-like, but still delicious.
I’ve also made these as a layer in a refreshing summer dessert platter alongside fresh fruit and berries—the creamy bars balance perfectly with bright, acidic fruit.
Serving & Storage Suggestions
These bars are versatile when it comes to serving. Here’s how I like to do it.
Serving Temperature: I prefer these bars cold, straight from the fridge. The texture is firm and creamy, almost like a cheesecake mousse. But they’re also wonderful at room temperature—the filling becomes softer and more luscious. For the best of both worlds, let them sit out for 10-15 minutes before serving.
Presentation Ideas: Dust the tops with a little powdered sugar or cocoa powder for a pretty finish. Add a dollop of whipped cream and a sprinkle of crushed Biscoff cookies. For a more elegant presentation, drizzle with extra cookie butter and top with fresh raspberries—the tartness cuts through the richness beautifully.
Pairing Suggestions: These bars are fantastic with a cup of coffee or espresso (the bitterness balances the sweetness). For a dessert spread, serve them alongside savory appetizers like my Mediterranean stuffed mini peppers for a sweet-savory contrast. A glass of cold milk or a scoop of vanilla ice cream also works wonders.
Storage Instructions: Store leftover bars in an airtight container in the refrigerator for up to 5 days. They actually get better after a day or two as the flavors meld. To freeze, wrap individual bars tightly in plastic wrap, then place them in a freezer-safe bag or container. They’ll keep for up to 3 months. Thaw in the refrigerator overnight before serving.
Reheating: These bars are best served cold or at room temperature, so reheating isn’t really necessary. But if you want a warm dessert, microwave a single bar for 10-15 seconds. The cookie butter swirl becomes slightly melty and the crust stays crunchy—it’s a different experience, but a good one.
Nutritional Information & Benefits
Let’s be real—these are indulgent bars. But here’s the breakdown so you can plan accordingly.
| Nutrient | Per Bar (1/9 recipe) |
|---|---|
| Calories | 385 |
| Total Fat | 26g |
| Saturated Fat | 14g |
| Cholesterol | 95mg |
| Sodium | 280mg |
| Total Carbohydrates | 33g |
| Dietary Fiber | 1g |
| Sugars | 24g |
| Protein | 6g |
Health Benefits: I’m not going to pretend these are health food, but there are a few redeeming qualities. The cream cheese provides a decent amount of protein and calcium. The Biscoff cookies contain a small amount of iron and fiber from the wheat flour. And let’s be honest—sometimes you need a dessert that’s purely for the soul. These bars are that dessert.
Dietary Considerations: This recipe contains gluten, dairy, and eggs. For gluten-free, use gluten-free speculoos cookies. For dairy-free, use dairy-free cream cheese and coconut cream. For a lower-sugar version, reduce the sugar in the filling to ⅓ cup and use a sugar-free cookie butter (if you can find it).
Allergen Warning: Contains wheat, dairy, and eggs. May contain traces of nuts depending on the brand of cookies used. Always check labels if serving to someone with allergies.
Conclusion
These Creamy Biscoff Cheesecake Bars with Cookie Butter Swirl are the kind of dessert that makes you look like a hero with almost no effort. They’re rich, creamy, and packed with that warm, spiced Biscoff flavor that everyone loves. The best part? You can make them ahead, they travel well, and they’re always a hit.
I love this recipe because it reminds me that sometimes the best things come from last-minute improvisation. That jar of cookie butter sitting in your pantry? It’s destined for greatness. Whether you’re hosting a party, bringing dessert to a potluck, or just treating yourself on a Tuesday night, these bars deliver every single time.
Go ahead and customize them—swap the swirl, add some chocolate, make them mini. I’d love to hear how they turn out. Drop a comment below and let me know your favorite variation, or tag me in your photos if you share them online. Happy baking, friends!
Frequently Asked Questions
Can I use a different cookie for the crust?
Absolutely. Graham crackers, digestive biscuits, or any spiced cookie like ginger snaps or speculoos work great. Just make sure you have about 1 ½ cups of fine crumbs.
Why did my cheesecake bars crack?
This usually happens from over-mixing the batter (too much air) or over-baking. Make sure you mix on low speed and use the jiggle test to avoid over-baking. Also, avoid opening the oven door during baking—temperature fluctuations can cause cracks.
Can I make these bars in advance?
Yes! They actually taste better after a day in the fridge. You can make them up to 3 days ahead and store them covered in the refrigerator. They’re perfect for party prep.
How do I get clean slices?
Chill the bars for at least 4 hours (overnight is best). Use a sharp knife and wipe it clean between each slice. You can also run the knife under hot water and dry it before cutting—this helps the knife glide through the cold cheesecake.
Can I freeze these bars?
Yes, they freeze beautifully. Wrap individual bars in plastic wrap, then place them in a freezer bag. They’ll keep for up to 3 months. Thaw in the refrigerator overnight before serving.
PrintCreamy Biscoff Cheesecake Bars: Easy Cookie Butter Recipe
These creamy Biscoff cheesecake bars feature a crunchy cookie crust, a silky cheesecake filling, and a beautiful cookie butter swirl. They’re quick, easy, and perfect for any occasion.
- Prep Time: 20 minutes
- Cook Time: 35-40 minutes
- Total Time: 4 hours 55 minutes (includes chilling)
- Yield: 9 bars 1x
- Category: Dessert
- Cuisine: American
Ingredients
- 1 ½ cups Biscoff cookie crumbs (about 20–22 cookies, crushed fine)
- 5 tablespoons unsalted butter, melted
- 2 tablespoons granulated sugar
- Pinch of salt
- 16 ounces cream cheese, softened to room temperature
- ½ cup granulated sugar
- 2 large eggs, room temperature
- ⅓ cup heavy cream, room temperature
- 1 teaspoon vanilla extract
- Pinch of salt
- ⅓ cup Biscoff cookie butter spread (crunchy or smooth)
- 1 tablespoon heavy cream
Instructions
- Preheat your oven to 325°F (160°C). Line an 8×8-inch baking pan with two overlapping strips of parchment paper, leaving a 2-inch overhang on two opposite sides. Lightly grease the parchment with butter or non-stick spray.
- Make the crust: In a food processor, pulse the Biscoff cookies until they become fine crumbs. Transfer to a medium bowl, add the melted butter, 2 tablespoons sugar, and a pinch of salt. Stir with a fork until the mixture looks like wet sand and holds together when pressed. Pour the crumbs into the prepared pan and press them firmly into an even layer. Bake for 8 minutes, then set aside to cool slightly.
- Beat the cream cheese: In a large mixing bowl, beat the softened cream cheese with an electric hand mixer on medium speed until completely smooth, about 2 minutes. Scrape down the sides and bottom of the bowl.
- Add the sugar and salt: Add the ½ cup sugar and pinch of salt to the cream cheese. Beat on medium speed until well combined, about 1 minute. Scrape the bowl again.
- Add the eggs one at a time: Crack one egg into the bowl and beat on low speed just until incorporated, about 15 seconds. Add the second egg and repeat. Do not over-mix.
- Add the heavy cream and vanilla: Pour in the heavy cream and vanilla extract. Beat on low speed until just combined, about 20 seconds. The batter should be smooth and silky.
- Pour the filling over the crust: Pour the cheesecake filling over the pre-baked crust. Use a spatula to spread it into an even layer. Tap the pan gently on the counter to release any air bubbles.
- Make the cookie butter swirl: In a small microwave-safe bowl, warm the Biscoff cookie butter spread for 10-15 seconds until loose. Stir in 1 tablespoon of heavy cream until smooth. Drizzle the mixture over the cheesecake filling in random lines. Use a toothpick or skewer to gently swirl the cookie butter into the batter.
- Bake the bars: Place the pan in the preheated oven and bake for 35-40 minutes, or until the edges are set and the center has a slight jiggle when shaken. If the top browns too quickly, tent loosely with foil after 25 minutes.
- Cool completely: Remove the pan from the oven and place on a wire rack. Let cool at room temperature for 1 hour. Then transfer to the refrigerator and chill for at least 4 hours, preferably overnight.
- Slice and serve: Once fully chilled, lift the bars out of the pan using the parchment handles. Place on a cutting board and slice into 9 even squares. Wipe the knife clean between each slice for clean cuts. Serve cold or at room temperature.
Notes
Room temperature ingredients are essential for a smooth texture. Do not over-mix the batter to avoid cracks. Use the jiggle test to determine doneness. Chill for at least 4 hours for clean slices. For a gluten-free version, use gluten-free speculoos cookies. For dairy-free, use dairy-free cream cheese and coconut cream.
Nutrition
- Serving Size: 1 bar
- Calories: 385
- Sugar: 24
- Sodium: 280
- Fat: 26
- Saturated Fat: 14
- Carbohydrates: 33
- Fiber: 1
- Protein: 6
Keywords: Biscoff cheesecake bars, cookie butter cheesecake, easy cheesecake bars, gluten-free dessert, no-bake cheesecake, Biscoff dessert


