My niece looked me dead in the eye and said, “Auntie, I want a cake that looks like a monster ate another cake.” That was the moment I realized regular birthday cakes weren’t going to cut it anymore. For a while, I just accepted that Halloween desserts were either too cute (think smiling pumpkins) or too complicated (those multi-tiered fondant nightmares). There had to be a middle ground—something that actually looked monstrous but didn’t require a pastry degree or three days of prep.
The first attempt was a disaster. I threw every candy I could find into a chocolate cake batter, and it sank like a stone. The second try was better—still ugly, but in a sad way, not a scary way. Then I started thinking about what makes a cake feel truly monstrous. It’s not just about looking messy. It’s about texture, about surprise bites of something crunchy or chewy, about that moment when someone cuts a slice and finds a hidden pocket of caramel or a cluster of candy eyes staring back at them.
This Best Halloween Monster Cookie Cake came together after a solid month of testing (and eating a lot of mistakes, honestly). It’s the kind of cake that makes kids gasp and adults laugh. The cookies on top aren’t just decoration—they’re baked right into the structure, creating these incredible pockets of chewy, chocolatey goodness. And the frosting? It’s supposed to look like a monster swiped at it. No piping skills required. That’s the beauty of this thing—the messier it looks, the better.
I remember pulling the first successful version out of the oven and just staring at it. It wasn’t perfect. The cookies had spread a little too much, and the frosting was definitely lopsided. But my niece took one look and whispered, “That’s the one.” And honestly? That’s all the validation I needed.
Why You’ll Love This Recipe
Let me tell you why this cake has become my most-requested Halloween recipe (and I’m not exaggerating when I say I’ve made it for three separate parties this October alone).
- No Special Skills Required : If you can stir a bowl and press cookies into batter, you can make this cake. There’s no complicated layering, no precise piping, no tempering chocolate. It’s practically foolproof.
- One Bowl, Less Mess : The batter comes together in a single bowl. No creaming butter and sugar separately, no sifting dry ingredients into a separate bowl. Just dump, stir, and pour.
- Built-In Surprise Factor : Those cookies aren’t just sitting on top—they sink slightly into the batter as it bakes, creating these amazing pockets of chewy cookie inside the cake. Every slice is a little different.
- Perfect for Halloween Parties : This cake feeds a crowd (12-16 generous slices), and it’s the kind of dessert that becomes the center of attention. People take photos before they take bites.
- Customizable Candy Situation : Use whatever Halloween candy you have lying around. Leftover Reese’s? Throw them in. Extra Kit Kats? Chop them up. This recipe is forgiving that way.
- The Ugly Duckling Factor : This cake looks genuinely monstrous—lopsided cookies, cracked frosting, candy eyes staring in different directions. And that’s exactly the point. It’s the one dessert where looking messy is a feature, not a bug.
I’ve made this cake for kids who usually push their birthday cake aside to get to the ice cream, and they went back for seconds. I’ve made it for adults who swore they were “too full for dessert” and watched them sneak another slice when they thought no one was looking. There’s something about the combination of tender cake, chewy cookies, and creamy frosting that hits a primal comfort-food button. It’s the kind of dessert that makes you close your eyes after the first bite—even if you’re wearing a witch hat and fake spiderwebs in your hair.
What Ingredients You Will Need
This recipe uses mostly pantry staples, plus a few fun additions that make it feel special. The beauty of this cake is that you can swap things around based on what you have, but here’s what I’ve found works best after extensive testing.
For the Cake Batter
- 2 ½ cups (315g) all-purpose flour – Spoon and level it, don’t scoop straight from the bag. Too much flour makes the cake dense.
- 1 ½ cups (300g) granulated sugar – Regular white sugar works perfectly here. No need for anything fancy.
- ½ cup (100g) packed light brown sugar – This adds moisture and a subtle molasses note that plays well with the chocolate.
- 1 cup (240ml) buttermilk – Room temperature, please. If you don’t have buttermilk, add 1 tablespoon of lemon juice to regular milk and let it sit for 5 minutes.
- ½ cup (120ml) vegetable oil – Keeps the cake tender even after a few days. I’ve used canola and avocado oil too, both work great.
- 3 large eggs – Room temperature. Cold eggs can seize the batter and make the cake tough.
- 2 teaspoons vanilla extract – Pure vanilla, not imitation. Trust me on this one.
- ¾ cup (90g) unsweetened cocoa powder – I prefer Dutch-processed for a deeper color, but natural cocoa works fine too.
- 1 ½ teaspoons baking powder – Check the expiration date. Old baking powder is the number one reason cakes don’t rise.
- 1 teaspoon baking soda – Helps the cake brown and rise properly.
- ½ teaspoon salt – Don’t skip it. Salt makes the chocolate taste more chocolatey.
For the Monster Toppings
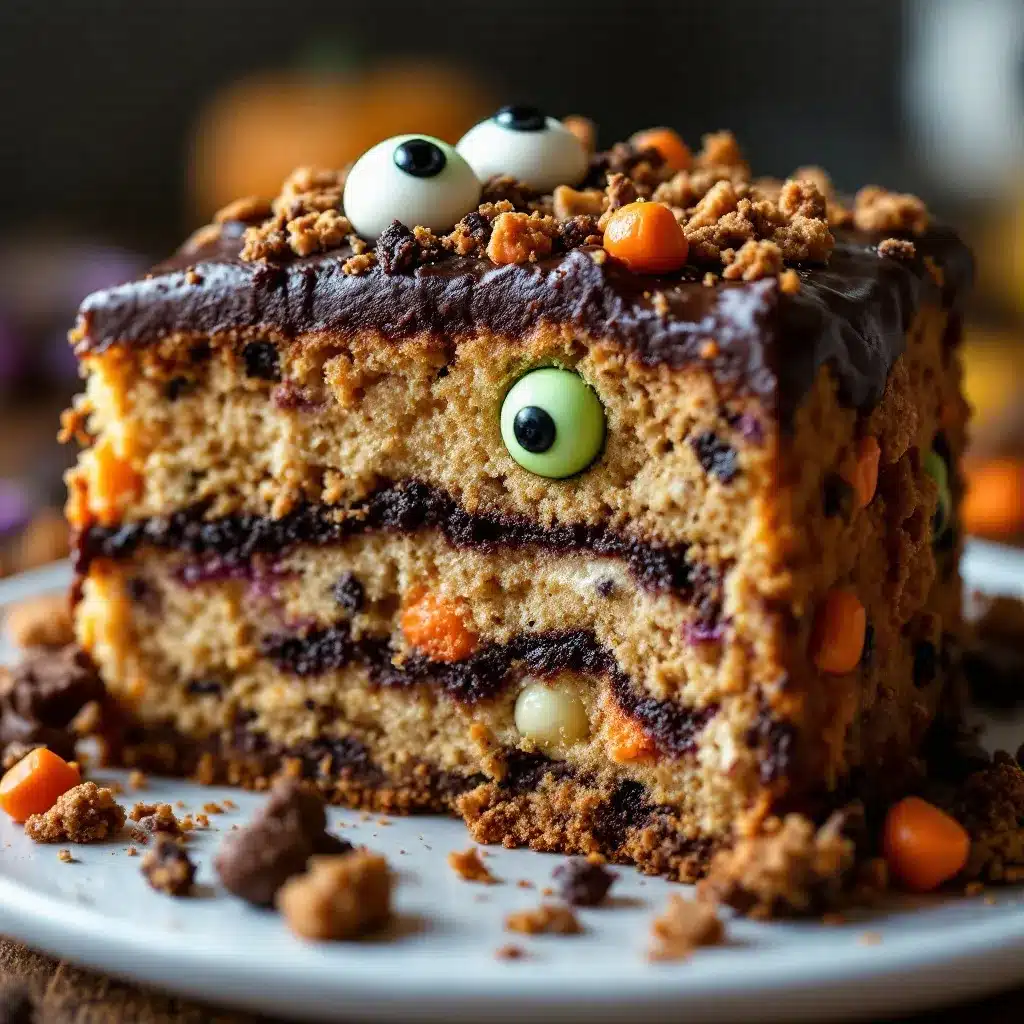
- 12-15 soft-baked chocolate chip cookies – Store-bought is totally fine. I’ve used Chips Ahoy and Toll House, both work. The key is that they’re soft, not crispy.
- 1 cup (175g) Halloween candy pieces – Think chopped Reese’s, Kit Kats, candy corn, or M&Ms. Whatever you’ve got.
- Candy eyes – You can find these at most grocery stores in the baking aisle. Get the big ones for maximum monster effect.
- Pretzel sticks or broken pretzel pieces – These become monster fingers or claws sticking out of the cake. Optional but very fun.
For the Monster Frosting
- 1 cup (226g) unsalted butter – Softened but not melted. If it’s too soft, the frosting will be runny.
- 3 ½ cups (420g) powdered sugar – Sifted if it’s lumpy. Nobody wants a lumpy frosting.
- ¼ cup (60ml) heavy cream – Or whole milk in a pinch. Heavy cream makes it fluffier.
- 1 teaspoon vanilla extract – Same rule as above: pure vanilla.
- Green or purple food coloring – Gel food coloring works best. Liquid coloring can make the frosting too thin.
- 2-3 tablespoons unsweetened cocoa powder – Optional, for a chocolate monster frosting version.
I like to use Hershey’s cocoa powder for the batter—it’s affordable and gives a consistent result. For the candy eyes, Wilton makes good ones that don’t bleed color into the frosting. And if you’re wondering about the cookies, I’ve tested this with both homemade and store-bought, and honestly? Store-bought works better. They hold their shape and texture more reliably during baking.
Equipment Needed
You don’t need a fancy kitchen to pull this off. Here’s what you’ll actually use:
- 9-inch round cake pan – A 3-inch deep pan is ideal. If yours is shallow, put a baking sheet underneath to catch any overflow.
- Mixing bowls – One large bowl for the batter, one medium bowl for the frosting.
- Hand mixer or stand mixer – A whisk and some elbow grease work too, but a mixer makes the frosting fluffier.
- Rubber spatula – For scraping the bowl and folding in the candy.
- Cooling rack – Essential for even cooling. Don’t skip this step or the frosting will melt.
- Offset spatula – For spreading the frosting in a deliberately messy way. A butter knife works too.
- Parchment paper – Line the bottom of the pan for easy release. Trust me on this.
- Measuring cups and spoons – Accurate measurements matter in baking.
If you don’t have a 9-inch round pan, an 8-inch square pan works too—just adjust the baking time by about 5 minutes. I’ve also made this in a 10-inch cast iron skillet, which gives it a fun rustic look. The bake time changes slightly (about 35 minutes instead of 40), so keep an eye on it.
Preparation Method
Let’s walk through this step by step. I’ve included all the little details that make the difference between a good cake and a great one.
Step 1: Preheat and Prep
Preheat your oven to 350°F (175°C). Grease your 9-inch round cake pan with butter or non-stick spray, then line the bottom with a circle of parchment paper. This extra step guarantees the cake comes out clean—I learned this the hard way after a few crumbly disasters.
Step 2: Mix the Dry Ingredients
In a large mixing bowl, whisk together the flour, cocoa powder, baking powder, baking soda, and salt. Make sure there are no lumps of cocoa—those will leave bitter spots in the finished cake. I like to sift the cocoa powder into the bowl just to be safe.
Step 3: Combine the Wet Ingredients
In a separate bowl (or the same one if you’re brave), whisk together the buttermilk, vegetable oil, eggs, and vanilla extract until smooth. The mixture should look pale and slightly thickened. If your buttermilk was cold, let it sit on the counter for 10 minutes before adding the eggs.
Step 4: Make the Batter
Pour the wet ingredients into the dry ingredients and stir with a rubber spatula until just combined. A few streaks of flour are okay—overmixing will make the cake tough. Fold in the granulated and brown sugars, stirring gently until they dissolve. The batter will be thick and glossy, which is exactly what you want.
Step 5: Pour and Place the Cookies
Pour the batter into the prepared pan and spread it evenly. Now comes the fun part: press the soft-baked cookies into the batter, spacing them about 1 inch apart. Don’t push them all the way in—leave about half of each cookie exposed. They’ll sink slightly as the cake bakes, creating those gorgeous pockets of chewy cookie.
Step 6: Bake the Cake
Bake for 38-42 minutes, or until a toothpick inserted into the center (avoiding a cookie) comes out with just a few moist crumbs. The top should look set and slightly cracked around the cookies. Let the cake cool in the pan for 15 minutes, then transfer to a wire rack to cool completely. This is crucial—frosting a warm cake is a recipe for a melty mess.
Step 7: Make the Monster Frosting
While the cake cools, make the frosting. Beat the softened butter with a hand mixer until creamy, about 2 minutes. Gradually add the powdered sugar, one cup at a time, beating on low speed. Add the heavy cream and vanilla, then increase the speed to medium-high and beat for 3-4 minutes until light and fluffy. Add your food coloring and beat until evenly distributed. If the frosting seems too thick, add another tablespoon of cream. Too thin? Add more powdered sugar.
Step 8: Assemble the Monster
Once the cake is completely cool, spread the frosting over the top and sides in a deliberately messy way. Swirls, peaks, and uneven patches are encouraged—it’s a monster, remember? Press the candy eyes into the frosting, add pretzel “claws” sticking out from the sides, and sprinkle the chopped Halloween candy over the top. Don’t be neat about it. The more chaotic it looks, the better.
Step 9: Let It Set
Refrigerate the cake for at least 30 minutes before serving. This helps the frosting firm up and makes slicing cleaner. The cake actually tastes better the next day, once the flavors have had time to meld.
Cooking Tips & Techniques
I’ve made this cake about a dozen times now, and I’ve collected a few hard-won lessons along the way.
Don’t overbake. The cake continues to cook from residual heat after you pull it out of the oven. Take it out when the toothpick still has a few moist crumbs, not when it comes out clean. Overbaked cake is dry cake, and nobody wants that.
Room temperature ingredients matter. Cold eggs and cold buttermilk can make the batter seize up, resulting in a dense, tough cake. Set everything out on the counter 30 minutes before you start mixing. I keep a little timer on my phone to remind me.
Press the cookies gently. I once pushed them all the way into the batter, and they disappeared completely. You want them sitting halfway in, halfway out. Think of them as little islands in a sea of cake batter.
Use a serrated knife for slicing. The cookies create uneven spots in the cake, and a regular knife will tear it. A serrated knife saws through cleanly. I learned this after serving a few slices that looked like earthquake victims.
Let the frosting get fluffy. Don’t rush the beating process. Those 3-4 minutes of high-speed beating incorporate air that makes the frosting light and spreadable. It also helps it hold its shape better.
If the cake domes too much, level it. Sometimes the cookies cause uneven rising. Use a serrated knife to slice off any domed parts before frosting. Save those scraps for snacking—no judgment here.
One mistake I made early on: I tried to frost the cake while it was still slightly warm. The frosting melted into a green puddle that looked less like a monster and more like something that needed to be cleaned up. Patience, my friends. Patience.
Variations & Adaptations
This recipe is incredibly flexible. Here are some variations I’ve tried and loved:
Gluten-Free Monster Cake : Substitute the all-purpose flour with a 1:1 gluten-free baking flour blend. I’ve used King Arthur’s Measure for Measure flour with great results. The texture is slightly denser but still delicious. Make sure your cookies are gluten-free too.
Dairy-Free Version : Use almond milk with a tablespoon of lemon juice instead of buttermilk, coconut oil instead of butter, and a dairy-free cream cheese frosting. The cake won’t be quite as tender, but it’s still very good.
Chocolate Overload : Add ½ cup of chocolate chips to the batter along with the candy pieces. Use chocolate cookies instead of regular chocolate chip cookies. Frost with chocolate buttercream. It’s intense, but in the best way.
Peanut Butter Monster : Swirl ½ cup of creamy peanut butter into the batter before adding the cookies. Use peanut butter cookies instead of chocolate chip. Top with chopped Reese’s cups. This version disappears fastest at parties, I’ve noticed.
Funfetti Monster : Skip the cocoa powder and use vanilla cake batter instead. Add ½ cup of rainbow sprinkles. Use sugar cookies on top and white frosting with purple food coloring. It looks less scary and more party-monster, which some kids prefer.
Mini Monster Cupcakes : Divide the batter among 24 cupcake liners. Press a mini cookie into each one. Bake for 18-20 minutes. Frost and decorate individually. These are perfect for school parties or portion control (if that’s a thing you do).
I tried a pumpkin spice version last October that was surprisingly good—I added ½ cup of pumpkin puree and a teaspoon of pumpkin pie spice to the batter. The cookies sank a bit more than usual, but the flavor was spot-on for fall.
Serving & Storage Suggestions
This cake is best served at room temperature, which lets the frosting soften and the cake become extra tender. If you’ve refrigerated it, let it sit on the counter for about 20 minutes before slicing.
For serving, I like to put the whole cake on a large platter surrounded by extra candy eyes and pretzel sticks—it makes for a great photo op. A scoop of vanilla ice cream on the side is never a bad idea, especially if you want to lean into the whole “monster feast” theme.
Leftovers (if you have any) keep well in an airtight container at room temperature for up to 3 days. The cake actually gets more moist on day two as the flavors meld. If you live in a humid climate, refrigerate it to prevent the frosting from getting sticky.
For longer storage, wrap the unfrosted cake tightly in plastic wrap and freeze for up to 3 months. Frost it after thawing. I’ve done this for pre-Halloween prep, and it works beautifully. Just make sure the cake is completely cool before wrapping, or you’ll get ice crystals.
Reheating individual slices in the microwave for 10-15 seconds brings back that just-baked warmth. It’s dangerous how good this cake is warm, honestly. I’ve eaten it for breakfast more times than I care to admit.
One note: the cookies on top will soften over time. If you want them to stay crunchy, add them fresh just before serving. But honestly? The soft, chewy cookie pockets are part of what makes this cake special.
Nutritional Information & Benefits
Let’s be real—this is a treat, not a health food. But here’s the breakdown per slice (based on 14 servings):
- Calories : Approximately 480-520 per slice
- Fat : 24g (mostly from butter, oil, and cookies)
- Carbohydrates : 65g (hello, sugar and flour)
- Protein : 6g (from eggs and buttermilk)
- Fiber : 2g (from cocoa and flour)
- Sugar : 42g (it’s a celebration cake, okay?)
The cocoa powder in this cake is actually a decent source of antioxidants, specifically flavonoids that support heart health. The eggs provide protein and choline, which is important for brain function. And the buttermilk adds calcium and probiotics (if you’re using real cultured buttermilk).
This cake contains gluten, dairy, and eggs, so it’s not suitable for those with allergies to those ingredients—though I’ve included gluten-free and dairy-free variations above. The candy pieces may contain nuts, soy, and other allergens depending on what you choose.
My personal take: this is a once-in-a-while cake. It’s for Halloween parties, birthday celebrations, and those moments when you need something ridiculous and wonderful. Balance it with refreshing cucumber mint green tea cooler the next day and call it even.
Conclusion
This Best Halloween Monster Cookie Cake is the kind of recipe that makes you look forward to October all year. It’s ridiculous, it’s messy, it’s covered in candy eyes and pretzel claws, and it tastes absolutely incredible. The combination of tender chocolate cake, chewy cookie pockets, and creamy monster frosting is something you have to experience to believe.
What I love most about this cake is that it doesn’t take itself seriously. There’s no pressure to make it perfect, no anxiety about the frosting being smooth, no stress about the cookies being evenly spaced. The whole point is that it looks like a monster made it. And that freedom? That’s what makes baking fun.
I’d love to see your monster creations. Tag me when you make it, tell me what candy combinations you used, and definitely let me know if you came up with a variation I haven’t tried yet. This recipe is meant to be played with, adapted, and made your own.
Go forth and make something wonderfully ugly. Your Halloween table will thank you.
Frequently Asked Questions
Can I make this cake ahead of time?
Absolutely. You can bake the cake a day ahead, let it cool completely, wrap it tightly in plastic wrap, and refrigerate. Frost it the day you plan to serve it. The cake actually tastes better on day two.
Can I use homemade cookies instead of store-bought?
You can, but I’ve found store-bought soft-baked cookies work better. Homemade cookies tend to spread more and can become too soft during baking. If you want to use homemade, chill them for 30 minutes first to help them hold their shape.
How do I keep the candy eyes from bleeding?
Press the candy eyes into the frosting gently—don’t push them all the way in. The frosting will hold them in place without the color bleeding. If you’re worried about it, add the eyes right before serving.
Can I make this into a layer cake?
Yes! Double the batter and divide it between two 9-inch pans. Bake for 30-35 minutes instead of 40. Press cookies into both layers before baking. Stack with frosting in between. It’s extra monstrous and extra delicious.
My cake sank in the middle. What went wrong?
This usually happens if the oven door was opened too early (before the 30-minute mark) or if the baking powder was old. Make sure your oven is fully preheated and resist the urge to peek. If it still sinks, just cover it with extra frosting and candy—nobody will know.
For more Halloween baking inspiration, check out our full collection of festive recipes. And if you’re looking for something a little lighter to balance out all this sugar, this easy Mediterranean stuffed mini peppers with feta makes a great savory counterpoint to all the sweetness.
Pin This Recipe!
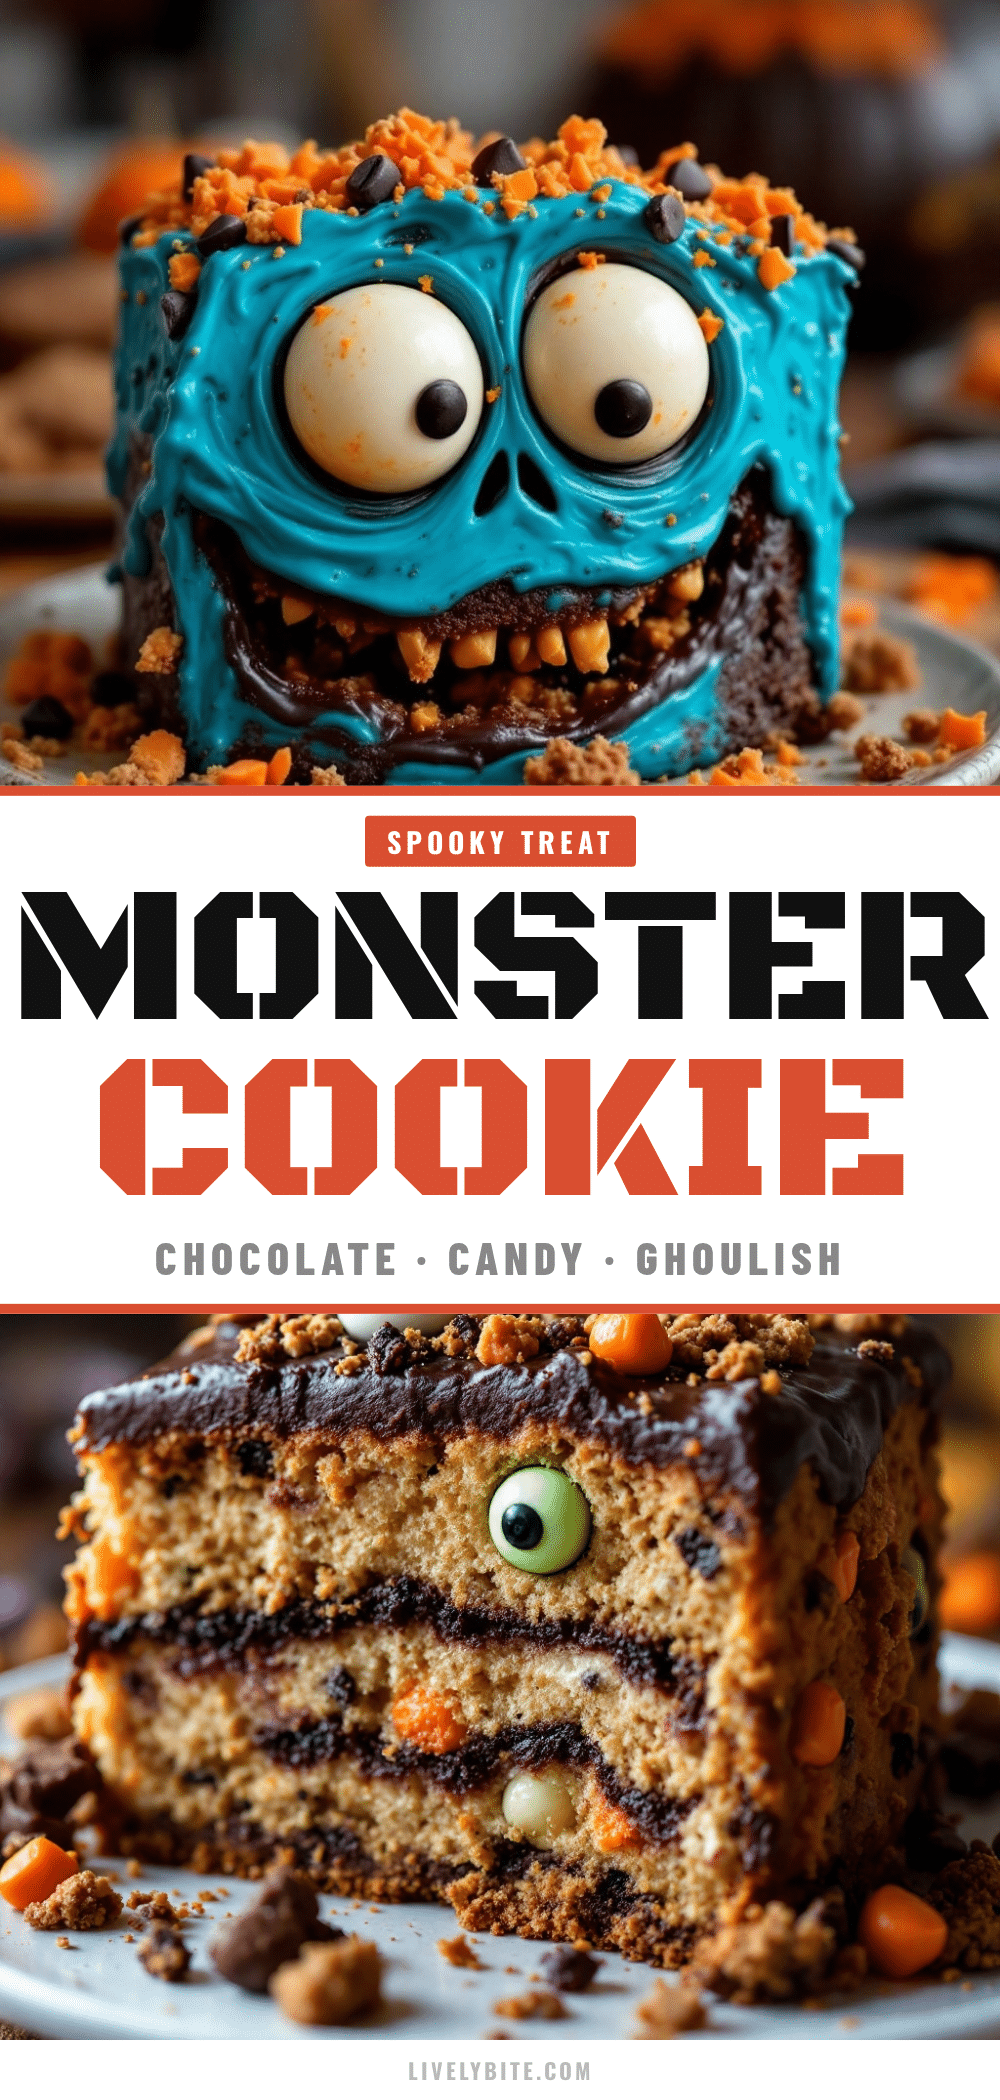
Best Easy Monster Cookie Cake for Halloween
A ridiculously fun and delicious Halloween cake that looks like a monster ate another cake. Tender chocolate cake is studded with soft-baked cookies and topped with a messy monster frosting, candy eyes, and pretzel claws.
- Prep Time: 20 minutes
- Cook Time: 40 minutes
- Total Time: 1 hour 30 minutes (includes cooling and setting time)
- Yield: 12-16 servings 1x
- Category: Dessert
- Cuisine: American
Ingredients
- 2 ½ cups (315g) all-purpose flour
- 1 ½ cups (300g) granulated sugar
- ½ cup (100g) packed light brown sugar
- 1 cup (240ml) buttermilk, room temperature
- ½ cup (120ml) vegetable oil
- 3 large eggs, room temperature
- 2 teaspoons vanilla extract
- ¾ cup (90g) unsweetened cocoa powder
- 1 ½ teaspoons baking powder
- 1 teaspoon baking soda
- ½ teaspoon salt
- 12–15 soft-baked chocolate chip cookies
- 1 cup (175g) Halloween candy pieces (chopped Reese’s, Kit Kats, candy corn, or M&Ms)
- Candy eyes
- Pretzel sticks or broken pretzel pieces (optional)
- 1 cup (226g) unsalted butter, softened
- 3 ½ cups (420g) powdered sugar, sifted if lumpy
- ¼ cup (60ml) heavy cream
- 1 teaspoon vanilla extract
- Green or purple food coloring (gel preferred)
- 2–3 tablespoons unsweetened cocoa powder (optional, for chocolate frosting)
Instructions
- Preheat oven to 350°F (175°C). Grease a 9-inch round cake pan and line the bottom with parchment paper.
- In a large bowl, whisk together flour, cocoa powder, baking powder, baking soda, and salt.
- In a separate bowl, whisk together buttermilk, vegetable oil, eggs, and vanilla extract until smooth.
- Pour wet ingredients into dry ingredients and stir with a rubber spatula until just combined. Fold in granulated and brown sugars until dissolved. Batter will be thick and glossy.
- Pour batter into prepared pan and spread evenly. Press soft-baked cookies into the batter, spacing about 1 inch apart, leaving about half of each cookie exposed.
- Bake for 38-42 minutes, until a toothpick inserted into the center (avoiding a cookie) comes out with a few moist crumbs. Cool in pan for 15 minutes, then transfer to a wire rack to cool completely.
- While cake cools, make frosting: Beat softened butter with a hand mixer until creamy, about 2 minutes. Gradually add powdered sugar, one cup at a time, beating on low. Add heavy cream and vanilla, then beat on medium-high for 3-4 minutes until light and fluffy. Add food coloring and beat until evenly distributed.
- Once cake is completely cool, spread frosting over top and sides in a deliberately messy way. Press candy eyes into frosting, add pretzel ‘claws’ sticking out from sides, and sprinkle chopped Halloween candy over the top.
- Refrigerate cake for at least 30 minutes before serving. Cake tastes even better the next day.
Notes
Store-bought soft-baked cookies work better than homemade for this recipe. Don’t overbake; take cake out when toothpick has a few moist crumbs. Room temperature ingredients are important for best texture. Use a serrated knife for slicing to avoid tearing the cake. The cake can be made a day ahead and frosted the day of serving.
Nutrition
- Serving Size: 1 slice (based on 14
- Calories: 500
- Sugar: 42
- Sodium: 320
- Fat: 24
- Saturated Fat: 12
- Carbohydrates: 65
- Fiber: 2
- Protein: 6
Keywords: Halloween cake, monster cake, cookie cake, chocolate cake, easy Halloween dessert, monster cookie cake


