The crunch is what matters. Not the creaminess, not the garlic, but that sudden, sharp snap when your fork breaks through the top layer. That is the whole point. Most green bean casseroles are soft. They are mushy, beige, and predictable. You know the type. They slide off the plate and taste like canned soup baked in a dish.
I stopped eating the standard version years ago. I wanted something with teeth. Something that held its shape. The best crispy garlic herb green bean casserole isn’t just a side dish. It is a texture experiment. It starts with bright, crisp green beans that haven’t been boiled into submission. They keep a little bite, a little green snap that contrasts with the rich, savory sauce.
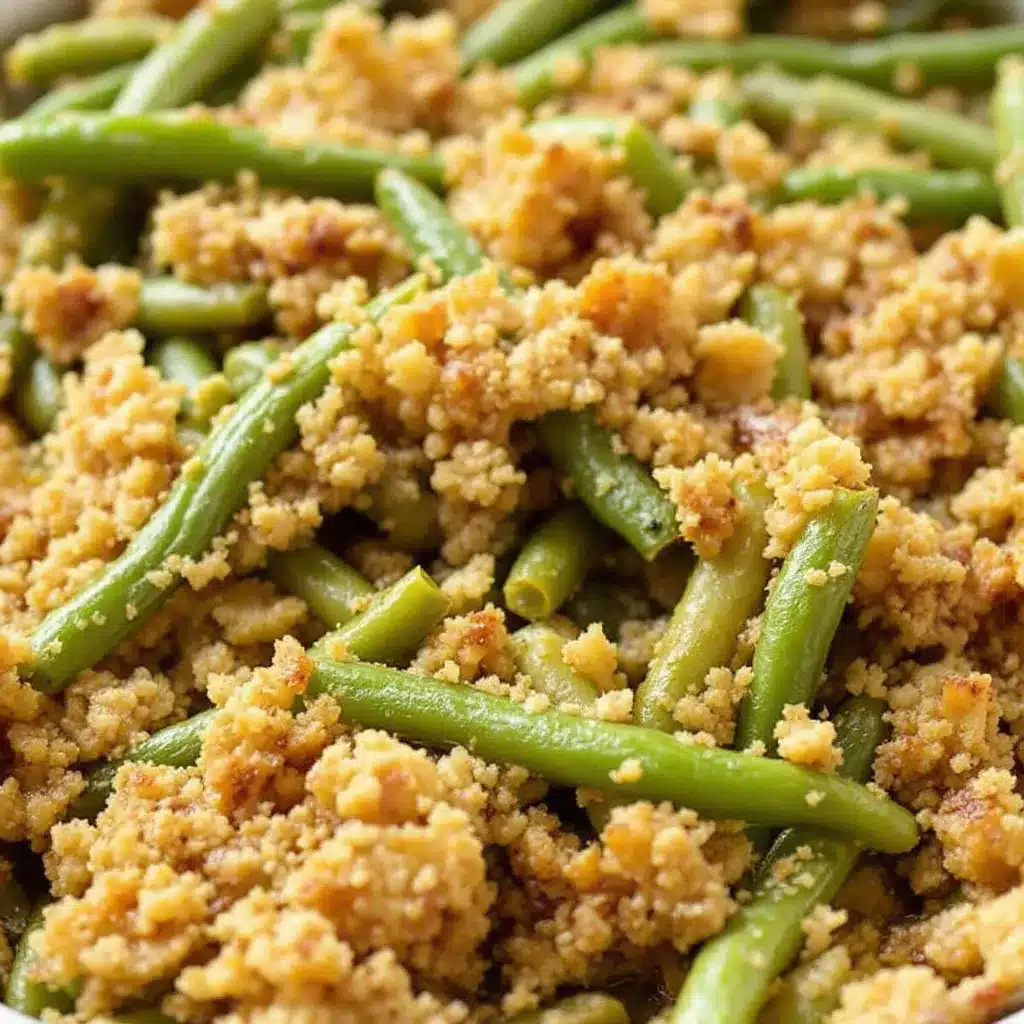
Then there is the topping. This is where the magic happens. Instead of soggy fried onions that turn to paste, we use a toasted herb and parmesan crust. It browns in the oven. It gets golden and shatteringly crisp. When you scoop a bite, the top layer crumbles. The sauce clings to the beans. The garlic hits you first, sharp and aromatic.
I made this for a dinner party last November. Everyone expected the usual. They saw the green beans and sighed. Then they took a bite. The room went quiet. You could hear the crunch. It wasn’t just food. It was an experience. The herbs—thyme, rosemary, maybe a little sage—add a woodsy depth that cuts through the richness.
This isn’t about following a rulebook. It is about getting the balance right. The sauce needs to be thick enough to coat, but not so thick it feels like paste. The beans need to be fresh or frozen, never canned. Canned beans have no soul. They are too soft. Fresh beans, blanched briefly, keep their color. They look vibrant against the golden crust.
The garlic is key. Not powder. Fresh cloves, minced fine. It blooms in the butter. The smell fills the kitchen. It smells like comfort, but with an edge. A sophisticated edge. That is what I aim for. I don’t want boring. I want memorable.
I still make this every holiday season. It has become my signature. People ask for the recipe before they even finish their main course. They want to know the secret. The secret is simplicity. Good ingredients. A little patience. And a willingness to let the topping get properly browned.
It’s not complicated. But it is special. And that is why it stuck with me. It turned a standard side into the star of the table.
Why You’ll Love This Recipe
This recipe isn’t just another holiday side dish. It is the result of years of trial, error, and a lot of tasting. I have tested dozens of versions. Some were too dry. Others were too greasy. This one hits the sweet spot. It balances texture and flavor perfectly. Here is why it works so well:
- Texture Contrast: The star of this dish is the crunch. Traditional casseroles rely on canned fried onions that turn soggy. We use a homemade blend of panko breadcrumbs, grated parmesan, and fresh herbs. It stays crispy even after baking. The contrast between the tender beans and the crunchy topping is addictive.
- Simple, Pantry Ingredients: You likely have everything you need. Green beans, butter, flour, milk, garlic, and herbs. No fancy cheeses or obscure spices. This makes it perfect for busy weeknights or last-minute holiday prep. It feels gourmet but requires no special grocery trip.
- Perfect for Holiday Gatherings: This is the ultimate crowd-pleaser. It pairs well with roasted turkey, glazed ham, or even grilled meats. It adds a pop of color to the plate. The garlic and herb notes complement almost any main course without overpowering it.
- Quick & Easy: Despite the delicious complexity, this comes together in under 45 minutes. The prep is minimal. The baking time is straightforward. You can make it while roasting the main dish. It frees up oven space by using a smaller baking dish.
- Unbelievably Delicious: The sauce is rich and creamy, but not heavy. The garlic is prominent but not overwhelming. The herbs add a fresh, aromatic finish. It is comfort food reimagined. It has the soul of a classic but the brightness of a modern dish.
What makes this different from the rest? It is the technique. We blanch the beans to keep them bright green and crisp-tender. We make a roux-based sauce from scratch, avoiding powdered soups. And we toast the topping separately or in the final minutes to ensure maximum crunch. This isn’t just a version. It is the best version. It is the kind of dish that makes you close your eyes after the first bite. It is the kind of side dish that gets scraped clean from the edges of the dish.
What Ingredients You Will Need
This recipe uses simple, wholesome ingredients to deliver bold flavor and satisfying texture without the fuss. The key is quality. Since there are few components, each one matters. We avoid canned goods entirely. Fresh or high-quality frozen beans are essential. The sauce is made from scratch, which gives you control over the salt and thickness.
Here is what you will need to make the best crispy garlic herb green bean casserole:
- Green Beans: 1.5 pounds of fresh green beans, trimmed and cut into 2-inch pieces. If using frozen, choose “cut green beans” rather than whole ones. They cook more evenly. Look for bright green, firm beans. Avoid any that are yellowing or limp.
- Unsalted Butter: 4 tablespoons. This provides the fat for the roux and the richness for the sauce. Use high-quality butter if possible. It makes a noticeable difference in flavor.
- All-Purpose Flour: 3 tablespoons. This thickens the sauce. It creates a velvety texture that coats the beans. Do not skip this step. The roux is the foundation of the creaminess.
- Whole Milk: 1.5 cups. Whole milk gives the best richness. For a lighter option, you can use half-and-half, but whole milk is standard. Room temperature milk prevents lumps when adding to the hot roux.
- Garlic: 4 cloves, minced finely. Fresh garlic is non-negotiable. Powdered garlic lacks the aromatic depth. Mince it so it distributes evenly throughout the sauce. You want a garlic kick in every bite.
- Dijon Mustard: 1 teaspoon. This adds a subtle tang and complexity. It cuts through the richness of the cream and cheese. It is a secret ingredient that elevates the savory profile.
- Chicken Broth: 1/2 cup. Low-sodium broth adds depth without making the dish too salty. It thins the sauce slightly and adds a savory umami note.
- Heavy Cream: 2 tablespoons. Added at the end for extra luxury. This ensures the sauce is silky and rich. It is optional but recommended for the “best” result.
- Salt and Black Pepper: To taste. Season well. The beans need salt to bring out their flavor. Taste the sauce before adding the beans.
- Panko Breadcrumbs: 1/2 cup. Japanese-style breadcrumbs are lighter and crispier than regular breadcrumbs. They absorb less oil and stay crunchy longer. This is crucial for the topping.
- Grated Parmesan Cheese: 1/4 cup. Freshly grated parmesan melts better and has a sharper flavor. Pre-grated cheese often contains anti-caking agents that prevent smooth melting.
- Fresh Herbs: 2 tablespoons total. Use a mix of thyme and rosemary. Chop them finely. They provide the aromatic “herb” component. Sage is also a great addition if you like it.
- Garlic Powder: 1/2 teaspoon. Added to the topping for an extra layer of garlic flavor. It complements the fresh garlic in the sauce.
- Olive Oil: 1 tablespoon. Used to toast the breadcrumbs and cheese. It helps them brown evenly and adds a fruity note.
I recommend using a microplane for the parmesan. It creates fine shreds that distribute evenly. For the herbs, keep them fresh. Dried herbs can be used in a pinch, but use half the amount. They are more potent and can become bitter if overused.
Equipment Needed
You do not need fancy gadgets for this. Standard kitchen tools work perfectly. Here is what you will need:
- Large Skillet or Dutch Oven: A 10-12 inch skillet is ideal for making the roux and sauce. A Dutch oven works too if you like to cook everything in one pot. Cast iron is great for even heating.
- Baking Dish: An 8×8 inch or 9×9 inch square baking dish. This size ensures the casserole is not too deep, allowing the topping to brown properly. A round dish works, but adjust the baking time slightly.
- Colander: For draining the blanched beans. A fine-mesh colander is best to catch small pieces.
- Whisk: Essential for creating a smooth roux without lumps. A silicone whisk is easier to handle.
- Measuring Cups and Spoons: For accuracy. Baking is chemistry, even in savory dishes. Precision matters.
- Knife and Cutting Board: For trimming beans and mincing garlic. A sharp chef’s knife makes quick work of the herbs.
- Small Bowl: For mixing the topping ingredients. Keep it separate from the sauce to avoid confusion.
If you do not have a baking dish, you can use a deep casserole dish. Just ensure it is oven-safe. Avoid glass dishes if your oven runs hot, as they can crack. Metal or ceramic are safer bets. A small toaster oven can be used for toasting the breadcrumbs if you want extra crispiness before adding them to the casserole. This step is optional but effective.
Preparation Method
Let’s get cooking. This process is straightforward. Follow these steps for the best results.
- Preheat and Prep: Preheat your oven to 375°F (190°C). Grease your 8×8 inch baking dish with a little butter or cooking spray. This prevents sticking and adds flavor. Have all ingredients measured and ready. This is called mise en place, and it makes cooking stress-free.
- Blanch the Green Beans: Bring a large pot of salted water to a boil. Add the trimmed green beans. Cook for 3-4 minutes until they are bright green and crisp-tender. Do not overcook them. They will continue to cook in the oven. Drain immediately and plunge them into an ice water bath. This stops the cooking process and keeps them vibrant. Drain well and pat dry with a towel. Excess water will thin the sauce.
- Make the Roux: In a large skillet over medium heat, melt the 4 tablespoons of butter. Once foamy, add the flour. Whisk constantly for about 1-2 minutes. The mixture should turn a light blonde color and smell nutty. This cooks out the raw flour taste. Do not let it burn.
- Add Liquids: Slowly pour in the chicken broth while whisking. Add the milk gradually. Continue whisking to prevent lumps. The sauce will thicken quickly. Let it simmer for 2-3 minutes until it coats the back of a spoon. This is a key consistency check.
- Season the Sauce: Stir in the minced garlic, Dijon mustard, salt, and pepper. Taste the sauce. Adjust seasoning if needed. It should be flavorful on its own. Stir in the heavy cream if using. Remove from heat.
- Combine Beans and Sauce: Add the blanched green beans to the skillet. Toss them gently until they are fully coated in the sauce. The beans should be glossy and creamy. If the sauce seems too thick, add a splash more milk. If too thin, cook for another minute.
- Transfer to Baking Dish: Pour the green bean mixture into the prepared baking dish. Spread it out evenly. It should be flat, not mounded. This helps the topping distribute evenly.
- Prepare the Topping: In a small bowl, combine the panko breadcrumbs, grated parmesan, chopped herbs, garlic powder, salt, and pepper. Drizzle with the olive oil. Toss with a fork until the breadcrumbs are evenly coated and look like wet sand. This ensures even browning.
- Add Topping: Sprinkle the breadcrumb mixture evenly over the green beans. Press it down lightly so it adheres to the sauce. This prevents it from flying off in the oven.
- Bake: Place the dish in the preheated oven. Bake for 15-20 minutes. You are looking for a golden brown, crispy topping. The sauce should be bubbling around the edges. If the topping browns too quickly, cover loosely with foil.
- Rest and Serve: Remove from the oven and let it rest for 5 minutes. This allows the sauce to set slightly, making it easier to serve. Garnish with extra fresh herbs if desired. Serve hot.
The total time is about 40 minutes. The blanching step is critical. Do not skip it. It ensures the beans have the right texture. The sauce should be thick enough to hold the beans but loose enough to pour. Adjust milk as needed.
Cooking Tips & Techniques
Getting this right takes a little attention. Here are some tips from my experience.
- Don’t Overcook the Beans: The biggest mistake is mushy beans. Blanch them for just 3 minutes. They should still have a bite. They will soften further in the oven.
- Whisk the Roux Well: Lumps in the sauce are unappetizing. Whisk constantly when adding the milk. If lumps form, strain the sauce through a sieve.
- Toast the Topping: For extra crunch, you can toast the panko mixture in a dry pan for 2 minutes before adding it to the casserole. This adds a nutty flavor.
- Use Fresh Garlic: Jarred garlic has a metallic taste. Fresh cloves are worth the effort. Mince them finely so they don’t overpower the bite.
- Monitor the Oven: Ovens vary. Check the casserole at 15 minutes. If the topping is dark, cover with foil. You want golden, not burnt.
- Rest Before Serving: Letting it rest for 5 minutes helps the sauce thicken. It makes serving cleaner and prevents a watery plate.
I once made this with canned beans. It was a disaster. The beans were too soft and tasted metallic. Fresh or frozen is the only way. Also, taste your cheese. Some parmesans are very salty. Adjust the added salt accordingly.
Variations & Adaptations
This recipe is flexible. Here are some ways to adapt it.
- Vegan Version: Use olive oil or vegan butter. Swap milk for oat or soy milk. Use nutritional yeast instead of parmesan. The texture will be slightly different but still delicious.
- Gluten-Free: Use gluten-free panko and flour. Ensure your broth is certified gluten-free. The result is nearly identical to the original.
- Add Protein: Add cooked bacon bits or shredded chicken to the mixture. This turns it into a main course. Bacon adds a smoky saltiness that pairs well with the herbs.
- Spicy Kick: Add a pinch of red pepper flakes to the sauce. Or use spicy parmesan. This adds a nice contrast to the creamy base.
- Herb Swap: Use parsley and chives for a milder flavor. Or use sage and thyme for a more earthy, autumnal taste. Rosemary is strong, so use sparingly.
I often add crispy bacon to the topping. It adds a salty crunch that complements the herbs. It is a personal favorite. Try it if you like pork.
Serving & Storage Suggestions
Serve this hot, right out of the oven. It pairs well with roasted meats. A glass of white wine or sparkling water complements the richness.
- Storage: Store leftovers in an airtight container in the refrigerator for up to 3 days.
- Reheating: Reheat in the oven at 350°F for 15 minutes to restore crispiness. Microwave reheating will make the topping soggy. If you must use the microwave, top with fresh breadcrumbs and broil for 1 minute.
- Freezing: This casserole does not freeze well. The beans become mushy upon thawing. It is best made fresh.
- Flavor Development: The flavors meld over time. Leftovers often taste better on day two, though the texture suffers slightly.
Presentation matters. Garnish with fresh thyme sprigs. It looks elegant and signals freshness. Serve in the baking dish for a rustic look.
Nutritional Information & Benefits
This dish is relatively balanced. Green beans are low in calories and high in fiber, vitamin K, and vitamin C. The sauce adds fat and calories, but the portion size is moderate.
- Calories: Approximately 250-300 calories per serving.
- Fat: Moderate fat content from butter, cream, and cheese.
- Carbs: Low to moderate, depending on the breadcrumb amount.
- Protein: Small amount from cheese and milk.
For a lighter version, use less butter and milk. Add more beans. The health benefits of green beans include improved digestion and bone health. This dish can be part of a healthy diet if portioned correctly. It is better than fried sides or heavy gravies.
Conclusion
This best crispy garlic herb green bean casserole is worth the effort. It transforms a simple vegetable into a showstopper. The crunch, the garlic, the herbs—it all comes together. I love this recipe because it is reliable yet exciting. It satisfies comfort food cravings with a sophisticated twist.
Try it for your next meal. Customize it with your favorite herbs. Share it with friends. I bet they will ask for the recipe. Leave a comment below with your variations. I love hearing how you adapt it.
Enjoy the crunch. It is the best part.
Frequently Asked Questions
Can I use frozen green beans?
Yes, frozen green beans work well. Use “cut” green beans for easier mixing. Do not thaw them completely before blanching. Cook them for an extra minute in the boiling water to ensure they are tender.
How do I prevent the topping from getting soggy?
Make sure the sauce is thick enough to coat the beans. If it is too watery, the topping will absorb moisture. Also, ensure the topping is well-toasted. Adding it in the last 10 minutes of baking helps preserve crispiness.
Can I make this ahead of time?
Yes. Prepare the sauce and beans up to the baking step. Cover and refrigerate for up to 24 hours. Add the topping just before baking. You may need to add 5 minutes to the baking time if the dish is cold.
What herbs work best in this recipe?
Thyme and rosemary are classic choices. Parsley and chives offer a fresher taste. Sage adds an earthy depth. Mix and match based on your preference. Fresh herbs are always better than dried.
Is this recipe gluten-free?
Not by default, as it uses flour and panko. However, you can easily make it gluten-free by using gluten-free flour and breadcrumbs. The taste and texture remain largely the same.
Pin This Recipe!
Best Crispy Garlic Herb Green Bean Casserole: Easy Holiday Side
A sophisticated twist on a classic holiday side, this green bean casserole features bright, crisp-tender beans in a rich, scratch-made garlic herb sauce, topped with a shatteringly crispy parmesan and panko crust.
- Prep Time: 15 minutes
- Cook Time: 25 minutes
- Total Time: 40 minutes
- Yield: 4 servings 1x
- Category: Side Dish
- Cuisine: American
Ingredients
- 1.5 pounds fresh green beans, trimmed and cut into 2-inch pieces
- 4 tablespoons unsalted butter
- 3 tablespoons all-purpose flour
- 1.5 cups whole milk
- 4 cloves garlic, minced finely
- 1 teaspoon Dijon mustard
- 1/2 cup low-sodium chicken broth
- 2 tablespoons heavy cream
- Salt and black pepper, to taste
- 1/2 cup panko breadcrumbs
- 1/4 cup grated parmesan cheese
- 2 tablespoons fresh herbs (thyme, rosemary, or sage), chopped finely
- 1/2 teaspoon garlic powder
- 1 tablespoon olive oil
Instructions
- Preheat oven to 375°F (190°C). Grease an 8×8 inch baking dish with butter or cooking spray.
- Bring a large pot of salted water to a boil. Add green beans and cook for 3-4 minutes until bright green and crisp-tender.
- Drain beans immediately and plunge into an ice water bath to stop cooking. Drain well and pat dry.
- In a large skillet over medium heat, melt butter. Add flour and whisk constantly for 1-2 minutes until light blonde and nutty.
- Slowly whisk in chicken broth, then gradually add milk. Simmer for 2-3 minutes until sauce coats the back of a spoon.
- Stir in minced garlic, Dijon mustard, salt, and pepper. Stir in heavy cream if using. Remove from heat.
- Add blanched green beans to the skillet and toss to coat evenly in the sauce.
- Transfer the green bean mixture to the prepared baking dish and spread evenly.
- In a small bowl, combine panko, parmesan, chopped herbs, garlic powder, salt, and pepper. Drizzle with olive oil and toss until breadcrumbs are coated.
- Sprinkle the topping evenly over the beans and press down lightly.
- Bake for 15-20 minutes until the topping is golden brown and the sauce is bubbling.
- Let rest for 5 minutes before serving.
Notes
Do not overcook the beans; they should remain crisp-tender as they will cook further in the oven. Use fresh garlic for best flavor. If the topping browns too quickly, cover loosely with foil. For extra crunch, toast the panko mixture in a dry pan before adding to the casserole.
Nutrition
- Serving Size: 1 serving
- Calories: 275
- Sugar: 5
- Sodium: 450
- Fat: 18
- Saturated Fat: 9
- Carbohydrates: 20
- Fiber: 4
- Protein: 8
Keywords: green bean casserole, holiday side dish, crispy green beans, garlic herb recipe, Thanksgiving side, easy casserole, homemade green beans


